How to Refresh and Restore Outdoor Porch Furniture: Step-by-Step DIY Guide
Learn how to refresh and restore outdoor porch furniture with this DIY step-by-step guide. Tips for wood, metal, wicker, and composite care and repair.
Home » Article » Diy » How To Refresh And Restore Outdoor Porch Furniture Step By Step Diy Guide
Outdoor porch furniture takes a beating—sun, rain, humidity, and everyday use slowly wear down even the best pieces. The good news is that refreshing and restoring your furniture doesn’t require hiring a professional. With a few tools, some patience, and the right approach, you can make your porch look brand‑new again.
Below is a complete, practical, step‑by‑step DIY guide designed for real results, whether you’re working with wood, metal, wicker, or composite furniture.
🌿 Quick Takeaway
You can restore outdoor porch furniture by cleaning it thoroughly, repairing damage, sanding or stripping old finishes, applying fresh stain or paint, and sealing it for long‑lasting protection. The exact steps depend on the material, but the workflow is similar across all furniture types.
🧰 What You’ll Need
- Mild soap or outdoor furniture cleaner
- Bucket, sponge, scrub brush
- Sandpaper (80–220 grit) or sanding block
- Wood filler or epoxy (for repairs)
- Exterior stain or paint
- Outdoor polyurethane or sealant
- Drop cloths
- Gloves, safety glasses
- Optional: power sander, pressure washer
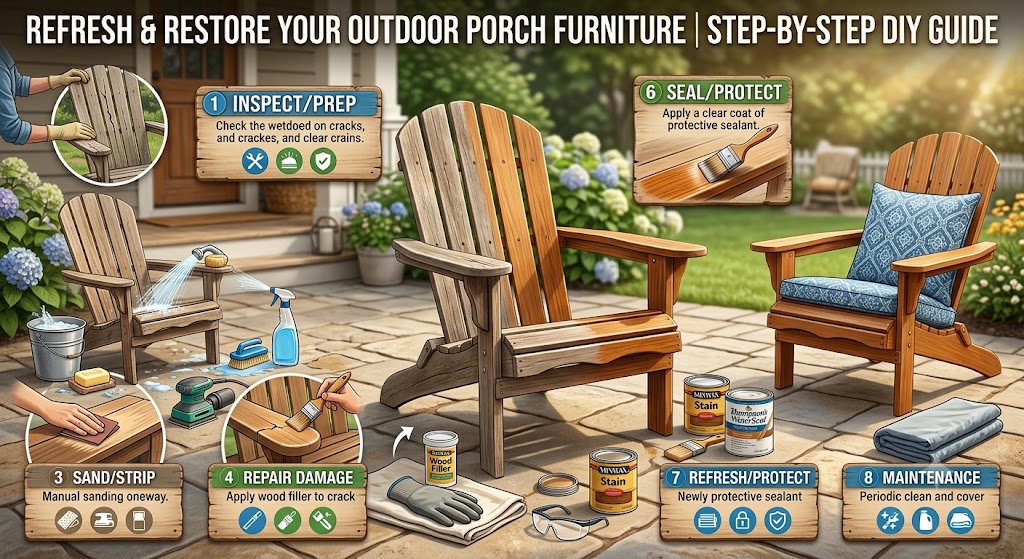
🪑 Step 1: Inspect and Prep Your Furniture
Before diving in, take a close look at each piece.
- Check for damage: loose screws, cracked slats, rust spots, peeling finish.
- Tighten hardware: bolts, screws, brackets.
- Remove cushions: wash or replace if needed.
- Set up your workspace: choose a dry, shaded area with good airflow.
Tip: If your furniture is wood and feels “fuzzy” or splintered, it’s a sign the finish has broken down and sanding will be essential.
🧼 Step 2: Deep Clean the Furniture
Cleaning is the foundation of a good restoration.
For Wood:
- Mix warm water with mild soap.
- Scrub with a soft brush following the grain.
- Rinse and let dry completely (usually 24 hours).
For Metal:
- Use a degreaser or dish soap.
- Remove rust with steel wool or a rust‑removal gel.
- Rinse and dry thoroughly.
For Wicker:
- Use a soft brush and mild soap.
- Avoid soaking—light rinsing only.
- Let dry fully to prevent warping.
For Composite/Plastic:
- Use soap and water or a diluted vinegar solution.
- Magic erasers work well for stubborn stains.
Advertisement
 Hosting Renewal Goal: $0 / $400 raised, updated daily.
🪵 Step 3: Sand or Strip the Old Finish (Wood Furniture)
If your wood furniture is faded, peeling, or uneven, sanding is your best friend.
Sanding Steps:
- Start with 80–120 grit to remove old stain or paint.
- Move to 150–180 grit for smoothing.
- Finish with 220 grit for a polished surface.
Power sanders speed up the job but be gentle around edges to avoid gouging.
Stripping (Optional):
If the finish is extremely thick or stubborn, use a chemical stripper. Follow manufacturer instructions and wear gloves.
🔧 Step 4: Repair Damage
Wood Repairs:
- Fill cracks or holes with wood filler.
- For structural damage, use epoxy wood repair kits.
- Sand smooth once dry.
Metal Repairs:
- Remove rust completely.
- Apply a rust‑inhibiting primer before painting.
Wicker Repairs:
- Replace broken strands if possible.
- Use outdoor‑grade glue for minor fixes.
🎨 Step 5: Apply Fresh Stain or Paint
This is where your furniture comes back to life.
Staining Wood:
- Choose an exterior stain (transparent, semi‑transparent, or solid).
- Apply with a brush or rag, following the grain.
- Wipe off excess to avoid blotching.
- Let dry per product instructions.
Painting Wood or Metal:
- Use exterior paint or spray paint designed for outdoor use.
- Apply thin, even coats.
- Allow proper drying time between coats.
Wicker:
- Spray paint works best—use light passes to avoid drips.
Advertisement
Hosting Renewal Goal: $0 / $400 raised, updated daily.
🛡️ Step 6: Seal and Protect
A protective topcoat ensures your hard work lasts.
Best Options:
- Outdoor polyurethane (for wood)
- Spar urethane (UV + water protection)
- Clear enamel spray (for metal)
Apply 1–3 coats depending on exposure to weather.
🛋️ Step 7: Refresh Cushions and Accessories
Don’t forget the finishing touches.
- Wash cushion covers or replace them.
- Add outdoor pillows for color.
- Consider a furniture cover for off‑season protection.
🌞 Step 8: Maintain Your Furniture
A little upkeep goes a long way.
- Clean lightly every 4–6 weeks.
- Reapply sealant yearly for wood.
- Touch up paint as needed.
- Store or cover furniture during harsh weather.
🏡 Final Thoughts
Restoring outdoor porch furniture is one of the most satisfying DIY projects—you save money, extend the life of your pieces, and transform your porch into a fresh, inviting space. Whether you’re reviving a weathered wooden bench or giving metal chairs a new shine, the steps above will guide you to a professional‑looking finish.
Disclaimer, No Liability: The authors and publishers of this website are not professional contractors and assume no liability or responsibility for any injury, damage, or financial loss resulting from the use or misuse of the information provided herein. All DIY projects are undertaken entirely at your own risk.
Related Articles
Advertisement

How to Refresh and Restore Outdoor Porch Furniture: Step-by-Step DIY Guide | Tricks and Tips for Life

Comments and Questions
Please log in to leave a comment or ask a question. Don't have an account? Register here.