How to Build a Simple Flagstone or Paver Walkway: Step-by-Step DIY Guide | Tricks and Tips for Life
How to Build a Simple Flagstone or Paver Walkway: Step-by-Step DIY Guide
Learn how to build a flagstone or paver walkway yourself with this detailed, step-by-step guide covering layout, base prep, cutting, setting, and finishing.
Home » Article » Diy » How To Build A Simple Flagstone Or Paver Walkway Step By Step Diy GuideThere's a particular kind of satisfaction that comes from walking across a path you built with your own two hands. Every time you head out to grab the mail or wander back from the garden, you get to notice the way the stones settle into the yard like they've always belonged there. A flagstone or paver walkway is one of those weekend projects that looks intimidating from the outside but is actually pretty forgiving once you understand the logic behind it. You're not pouring concrete. You're not welding anything. You're basically building a very sturdy, very attractive puzzle on top of dirt.
This guide walks through the whole process from start to finish, including the parts most tutorials gloss over, like what happens when your yard isn't perfectly flat or why your path might heave in the winter if you skip a step. Grab some coffee, and let's get into it.
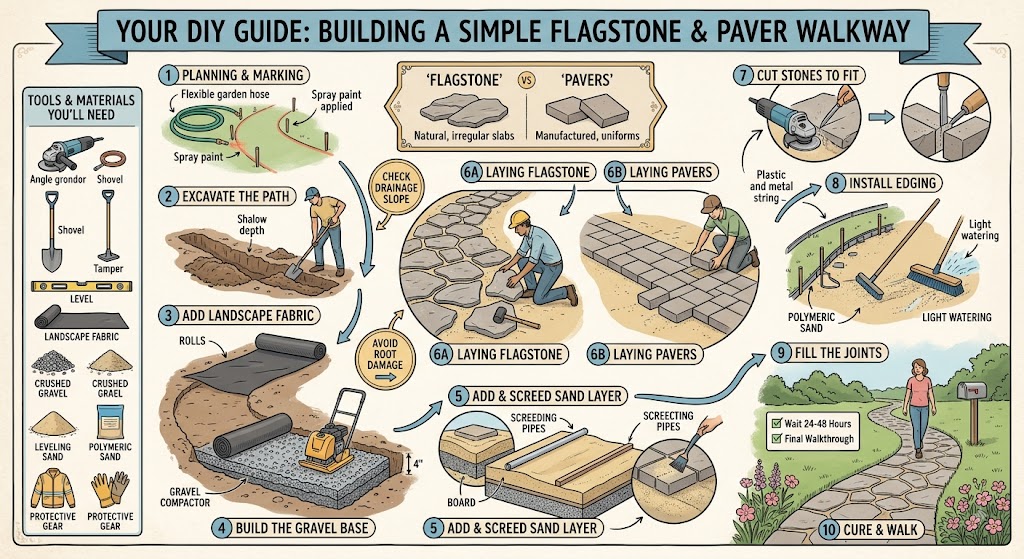
Flagstone vs. Pavers: Which One Fits Your Project?
Before you buy a single stone, it helps to know what you're actually choosing between. Flagstone refers to natural stone slabs, usually limestone, sandstone, bluestone, or slate, that are cut or split into flat pieces of irregular shape and varying thickness. Pavers, on the other hand, are manufactured units, typically made of concrete or clay, produced in uniform sizes and shapes so they fit together with mathematical precision.
Neither one is objectively better. It really comes down to the look you want and how much patience you have for fussing with layout.
| Feature | Details |
|---|---|
| Look | Flagstone gives an organic, natural, old-world feel with irregular edges and varied coloring. Pavers offer a clean, uniform, more modern look that's easy to keep symmetrical. |
| Installation difficulty | Flagstone requires more trial-and-error fitting since no two pieces are alike. Pavers snap into a grid pattern much faster once your base is level. |
| Cost | Natural flagstone generally costs more per square foot than standard concrete pavers, though high-end paver styles can close that gap. |
| Durability | Both hold up well for decades when installed on a proper base. Flagstone can chip at thin edges; pavers are consistently thick and less prone to cracking. |
| Best for | Flagstone suits garden paths, cottage-style yards, and curved walkways. Pavers suit straight, formal paths and driveways where consistency matters. |
Tools and Materials You'll Need
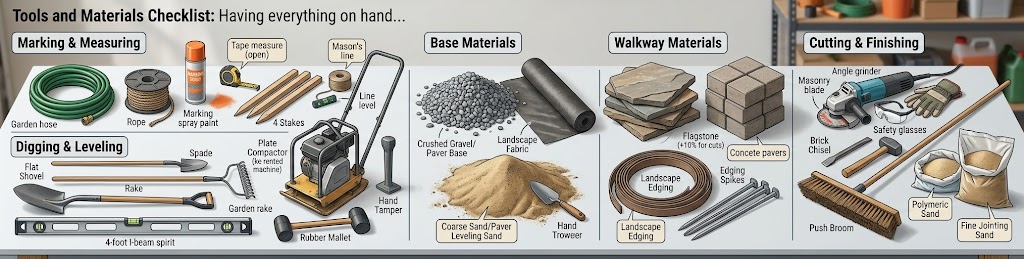
Having everything on hand before you start saves you from trips to the hardware store mid-project, which is where a lot of DIY momentum quietly dies. Here's what to gather.
| Category | Items |
|---|---|
| Marking & measuring | Garden hose or rope (for marking curves), spray paint or flour, tape measure, wooden stakes, mason's line, line level |
| Digging & leveling | Flat shovel, spade, garden rake, hand tamper or plate compactor, 4-foot level, rubber mallet |
| Base materials | Crushed gravel or paver base (often called Class II road base), coarse sand or paver leveling sand, landscape fabric |
| Walkway materials | Flagstone or pavers (buy 10 percent extra for cuts and mistakes), paver edging or steel/plastic landscape edging, edging spikes |
| Cutting & finishing | Angle grinder with masonry blade or a brick chisel and hand maul, push broom, polymeric sand or fine jointing sand, garden gloves, safety glasses |
Step 1: Plan the Route and Mark Your Layout
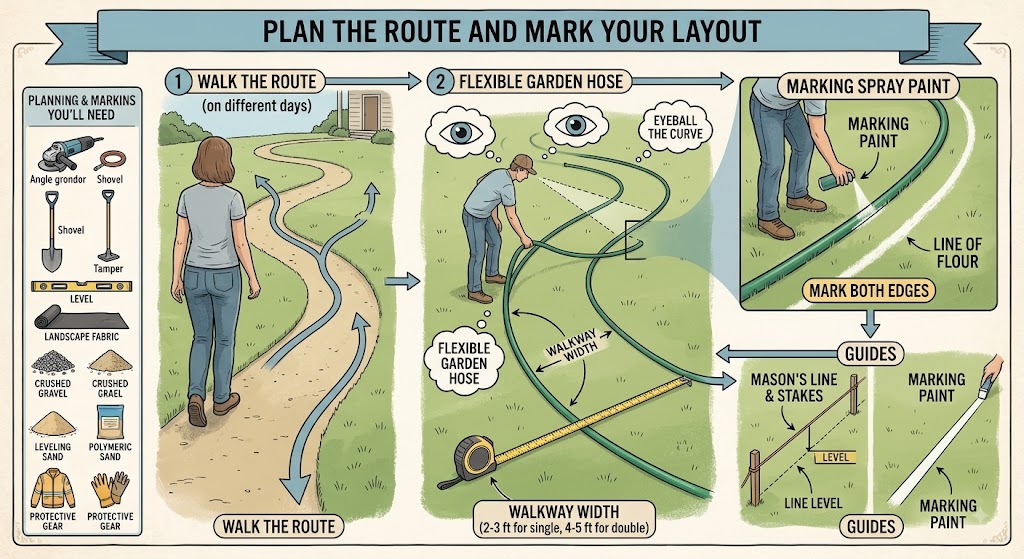
Walk the route you're imagining a few times before you touch a shovel. Seriously, do this on different days if you can. The path your feet naturally want to take is usually the right one, even if it curves a bit instead of running arrow-straight. A gentle curve also tends to look more natural in a yard than a rigid straight line, unless you're going for a formal, architectural feel.
Use a garden hose to lay out the shape you want. It bends easily and lets you stand back and eyeball the curve before committing. Once you're happy with it, trace along the hose with marking spray paint or a line of flour so the outline stays put even after you move the hose. For straight paths, drive stakes at each end, run a mason's line between them, and use that as your guide.
As for width, most single-person walkways work well between 2 and 3 feet wide. If you want two people to walk side by side comfortably, aim closer to 4 to 5 feet. Mark both edges of the path, not just the centerline, so you know exactly how much ground you'll be excavating.
Advertisement
Step 2: Excavate the Path
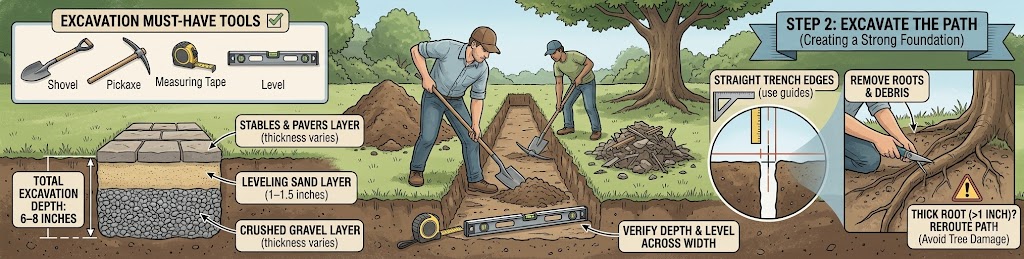
This is the step people love to rush, and it's the one that determines whether your walkway still looks great in five years or starts sinking and shifting after the first hard freeze. You're not just digging a shallow trench for the stones to sit in; you're creating a foundation.
Dig down about 6 to 8 inches across the entire width of the path. That depth needs to account for a gravel base layer, a sand setting layer, and the thickness of your stones or pavers themselves, with the finished surface sitting slightly above the surrounding grade so water doesn't pool on it. Keep the sides of the trench as straight and even as you can; a wobbly trench edge makes it much harder to keep your edging straight later.
As you dig, remove any roots, large rocks, or old debris hiding in the soil. If you hit a big root from a nearby tree, cutting it can sometimes be fine, but for roots thicker than an inch or so, it's worth rerouting the path slightly rather than risking damage to the tree.
Step 3: Add Landscape Fabric
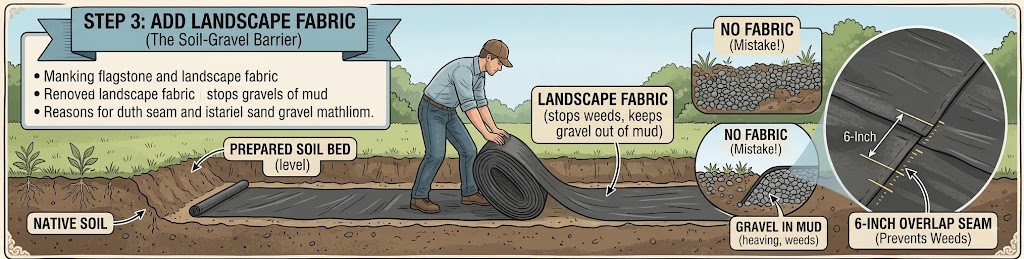
Once the trench is dug and the bottom is reasonably level, lay down a layer of landscape fabric across the entire excavated area. This step gets skipped constantly, and it's a mistake. The fabric acts as a barrier between the native soil and your gravel base, which stops weeds from pushing up through the joints and keeps the gravel from slowly working its way down into the mud below over time. Overlap any seams by at least 6 inches so weeds can't find a gap to sneak through.
Step 4: Build the Gravel Base
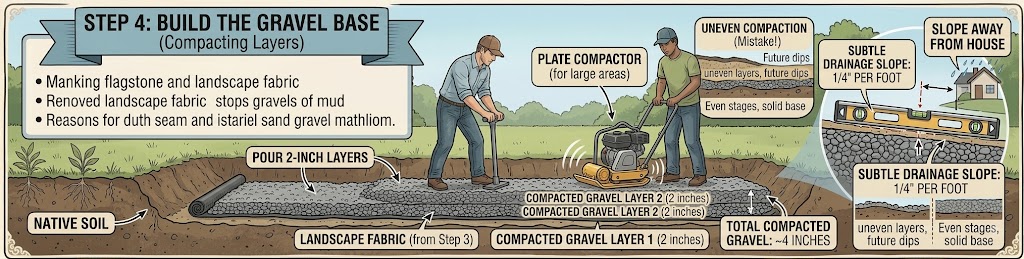
Pour in your crushed gravel base material in layers of about 2 inches at a time rather than dumping it all in at once. After each layer, compact it thoroughly using a hand tamper for small paths or a rented plate compactor for larger projects. Compacting in stages like this matters because a single deep layer tends to compact unevenly, leaving soft spots that will show up later as dips in your finished walkway.
Keep checking the surface with your level as you go, and slope the path very slightly, about a quarter inch per foot, away from your house or any structure. This subtle grade encourages rainwater to drain off the path naturally instead of collecting in puddles or seeping toward your foundation. You want roughly 4 inches of compacted gravel base once you're done, though this can vary a bit depending on your climate and soil type; colder regions with significant frost heave benefit from a slightly deeper base.
Step 5: Add and Screed the Sand Layer
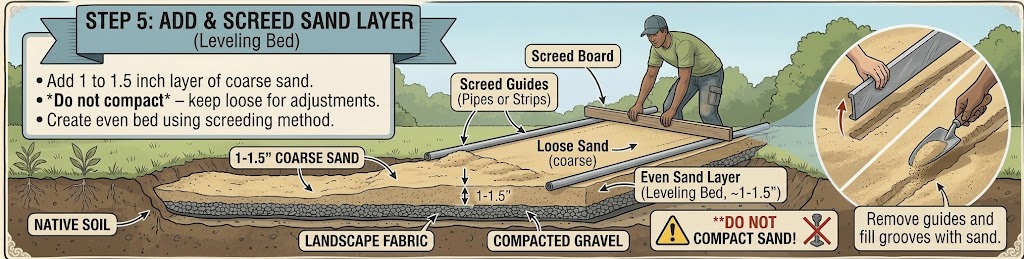
On top of the compacted gravel, add a 1 to 1.5 inch layer of coarse sand. This is your leveling bed, the layer that lets you make fine adjustments to each stone's height and tilt as you set it. Don't compact this layer; you want it loose enough to shift stones into place.
To get an even sand layer, a trick many installers use is called screeding. Lay two straight pipes or wooden strips along the edges of your path, spaced apart, then drag a straight board across the top of them to level the sand flush with the top of the guides. Remove the guides afterward and carefully fill in the small grooves they leave behind with a bit more sand.
Step 6: Lay Your Flagstone or Pavers
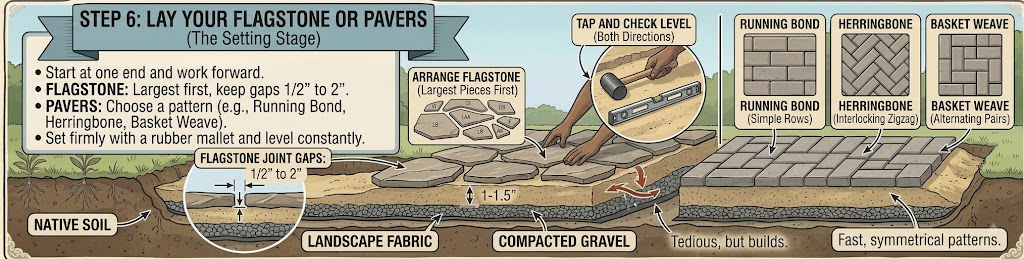
Now for the fun part, actually placing your stones. Start from one end and work steadily toward the other, laying pieces directly onto the sand bed.
If you're using flagstone, this stage becomes a bit of a puzzle. Lay several stones out on the grass beside the path first and arrange them like puzzle pieces, largest stones first, before setting them into the sand. Keep gaps between stones fairly consistent, usually between half an inch and 2 inches, since overly tight joints make it hard to fill with sand later and overly wide ones can feel unstable underfoot.
If you're using pavers, the process moves faster since the uniform shapes naturally line up. Common patterns include running bond (straight rows, offset like bricks), herringbone (a zigzag interlocking pattern that handles weight well), and basket weave (pairs of pavers alternating direction to form a woven look).
As you set each piece, press it firmly into the sand and tap it gently with a rubber mallet. Check it with your level constantly, both side to side and front to back, adjusting by adding or removing small amounts of sand underneath as needed. This is tedious, but it's the difference between a walkway that feels solid and one that rocks under your foot the first time it rains.
Advertisement
Step 7: Cut Stones or Pavers to Fit
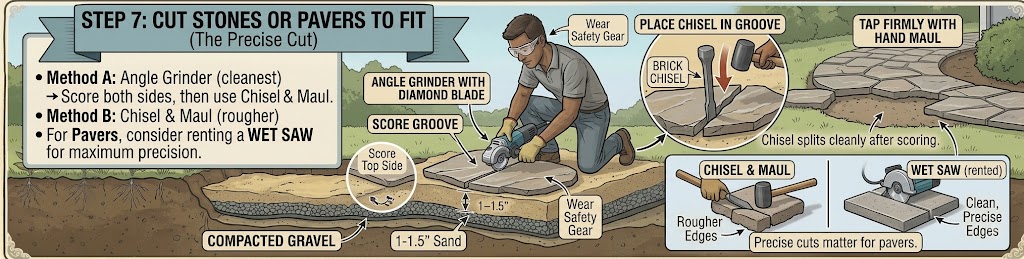
You will almost always need to cut a few pieces, especially around curves or where the path meets a driveway or patio. For a clean cut, mark the cut line with chalk, put on safety glasses and gloves, and use an angle grinder fitted with a diamond or masonry blade to score a groove along the line on both the top and bottom of the stone. Once scored, place a chisel in the groove and tap firmly with a hand maul; the stone should split cleanly along that line.
If you don't have a grinder, a brick chisel and maul alone can work for straighter cuts, though the edges will be rougher. For pavers, a wet saw rented from a hardware store gives the cleanest, most precise cuts, which matters more with pavers since their uniform shape makes any sloppy cut stand out.
Step 8: Install Edging
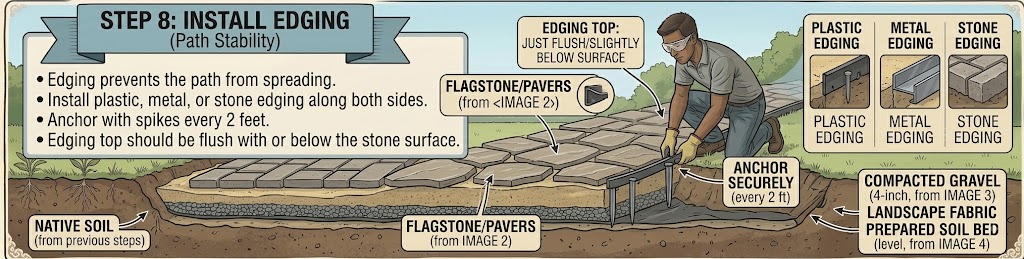
Edging isn't just decorative, it's what keeps your entire walkway from slowly spreading apart over time as soil shifts and people walk along the sides. Install plastic, metal, or stone edging along both sides of the path, anchoring it into the ground with edging spikes every couple of feet. Make sure the top of the edging sits just at or slightly below the surface of your stones so it stays hidden once the project is finished.
Step 9: Fill the Joints
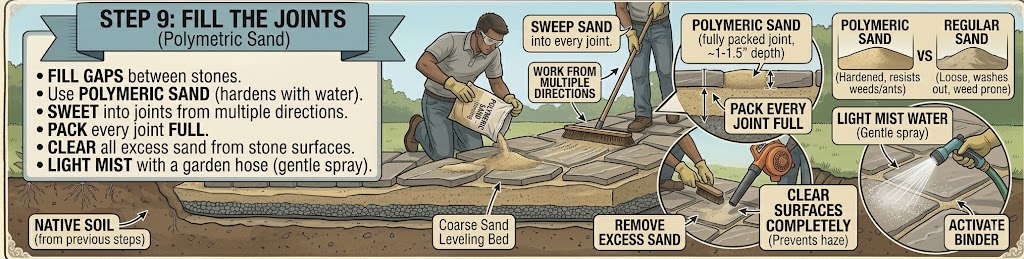
With everything set and leveled, it's time to fill the gaps between stones. Polymeric sand is the go-to choice here because, unlike regular sand, it contains binding agents that harden when activated with water, locking the joints in place and resisting weed growth and ant colonies far better than loose sand does.
Pour the polymeric sand over the entire surface and sweep it into every joint using a push broom, working it in from multiple directions to make sure the gaps are fully packed. Once the joints are filled, sweep away every bit of excess sand from the stone surfaces; leftover residue can leave a hazy film once it hardens. Then lightly mist the entire path with water using a hose set to a gentle spray, following the product instructions for timing and amount, since too much water washes the sand right back out of the joints and too little won't activate the binder.
Step 10: Let It Cure and Do a Final Walkthrough
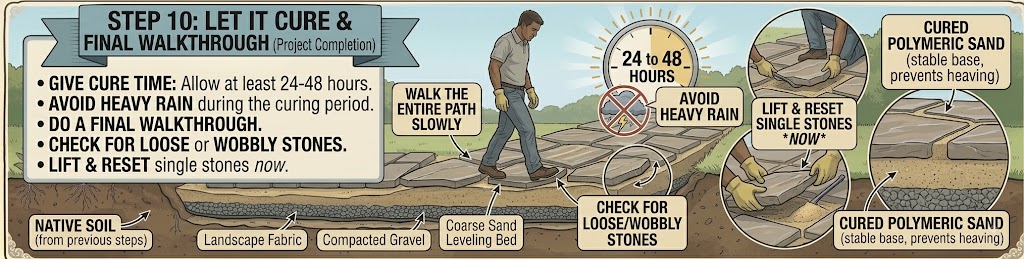
Give the polymeric sand at least 24 to 48 hours to cure fully before walking on the path regularly, and avoid heavy rain during that window if you can help it. Once it's cured, walk the entire length of your new path slowly and check for any stones that feel loose, wobbly, or unevenly set. It's much easier to lift and reset a single stone now than to fix it after months of foot traffic have compacted everything around it.
Common Mistakes to Avoid
- Skipping the gravel base entirely. Stones set directly on soil will sink, shift, and heave with the seasons no matter how careful your layout was.
- Making the path too narrow. Anything under 2 feet wide feels cramped and awkward to walk on, especially if you're carrying groceries or gardening tools.
- Ignoring drainage slope. A perfectly flat or improperly sloped path collects standing water, which speeds up erosion underneath and creates slick, icy patches in winter.
- Rushing the compaction. Soft spots in the base show up as sunken stones later, and by then, fixing it means pulling everything back up.
- Using loose sand instead of polymeric sand for joints. Loose sand washes out with every heavy rain and invites weeds and ants within a season.
How Long Does This Actually Take?
For a modestly sized path, say 20 to 30 feet long and 3 feet wide, plan on a full weekend if you're working alone, or a single long day with two people splitting the digging and setting work. The excavation and base preparation typically eat up more time than actually placing the stones, so don't be discouraged if day one feels like all digging and no visible progress. That foundation work is exactly what makes day two go smoothly.
Final Thoughts
A flagstone or paver walkway is one of those projects that rewards patience over speed. The actual placing of stones is the part everyone pictures when they imagine the project, but the unglamorous steps, the digging, the compacting, the leveling, are what actually determine whether your path still looks sharp a decade from now. Take your time on the base, keep checking your level obsessively, and don't be afraid to lift a stone back out and reset it if something feels off. Once it's done, you'll have a path that not only looks like it belongs in your yard but was actually built to last.
Disclaimer, No Liability: The authors and publishers of this website are not professional contractors and assume no liability or responsibility for any injury, damage, or financial loss resulting from the use or misuse of the information provided herein. All DIY projects are undertaken entirely at your own risk.
Related Articles
Advertisement
How to Build a Simple Flagstone or Paver Walkway: Step-by-Step DIY Guide | Tricks and Tips for Life
Comments and Questions
Please log in to leave a comment or ask a question. Don't have an account? Register here.