How to Install Downspout Extenders to Prevent Foundation Erosion: Step-by-Step DIY Guide | Tricks and Tips for Life
How to Install Downspout Extenders to Prevent Foundation Erosion: Step-by-Step DIY Guide
Learn how to install downspout extenders step-by-step to keep water away from your foundation, stop erosion, and prevent costly basement damage.
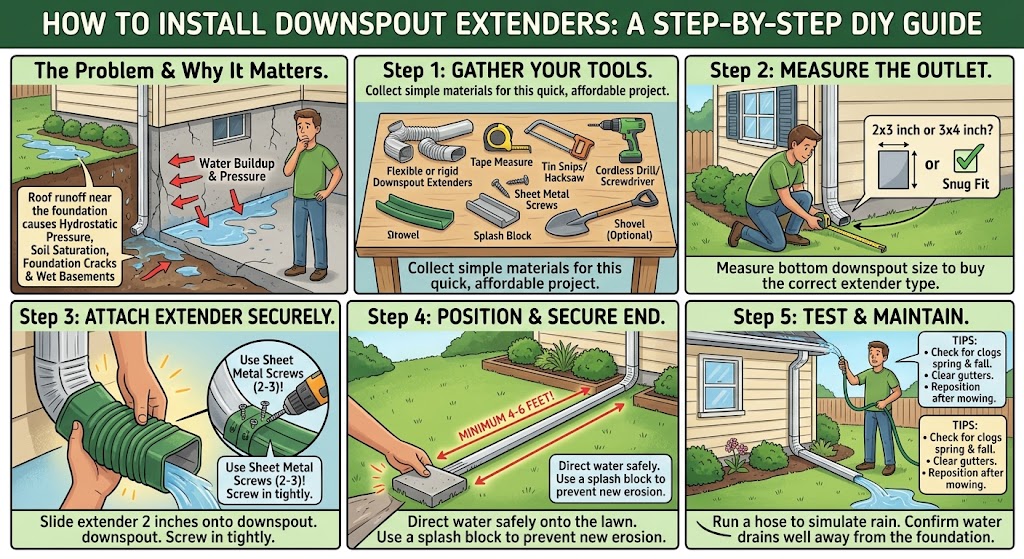
Home » Article » Diy » How To Install Downspout Extenders To Prevent Foundation Erosion Step By Step Diy GuideIf you've ever noticed puddles pooling near your basement walls after a heavy rain, or spotted small cracks creeping across your foundation, there's a good chance your downspouts are to blame. Most homes dump thousands of gallons of roof runoff within a couple feet of the foundation every single year, and over time that water finds its way into the soil, softens it, and starts pulling your foundation apart from the outside in. The fix is one of the cheapest and easiest home improvement projects you'll ever tackle: installing downspout extenders. This guide walks you through exactly why it matters and how to do it correctly, from measuring your gutters to burying the extension underground if you want a cleaner look.
Why Downspout Extenders Matter More Than Most Homeowners Realize
A typical downspout dumps water straight down onto the ground right next to your house. Without an extender, that water has nowhere to go except straight down into the soil surrounding your foundation footings. Over months and years, this repeated saturation causes the ground to expand and contract, a process that engineers call hydrostatic pressure buildup. That pressure pushes against basement walls, and in colder climates, freeze-thaw cycles make the damage even worse.
The consequences aren't just cosmetic. Foundation erosion can lead to bowing walls, sinking porches, uneven floors, and water seeping into your basement or crawl space. Repairing a compromised foundation can run anywhere from a few thousand dollars for minor crack sealing to tens of thousands for underpinning or wall reconstruction. A downspout extender, by contrast, typically costs between $10 and $40 and takes less than thirty minutes to install per downspout.
Signs Your Home Needs Downspout Extensions Right Now
Before grabbing your tools, it helps to know what you're looking for. Walk around your home's perimeter after the next rainstorm and check for these warning signs:
- Standing water or muddy soil within three feet of your foundation
- Mulch or soil that has visibly washed away near downspout locations
- Damp spots, efflorescence (white chalky residue), or musty smells in the basement
- Hairline cracks in the foundation wall, especially near corners
- Grass that grows unusually green or lush in a strip near the house (a sign of chronic overwatering)
If you notice any of these, downspout extenders should be near the top of your maintenance list.
Advertisement
What You'll Need Before You Start
This project doesn't require specialty tools or a trip to a hardware superstore for anything exotic. Most of what you need can be found in the gutter aisle of any home improvement store.
| Item | Purpose |
|---|---|
| Downspout extender or flexible extension | Directs water several feet away from the foundation; choose rigid, flexible corrugated, or roll-out style |
| Tape measure | Confirms downspout outlet size (2x3 inches or 3x4 inches is standard) and needed extension length |
| Tin snips or a hacksaw | Trims rigid aluminum or vinyl extenders to the correct length |
| Sheet metal screws (2-3 per connection) | Secures the extender firmly to the downspout so it won't blow off in wind |
| Drill or screwdriver | Drives the screws into the aluminum without cracking it |
| Splash block or extension elbow | Slows water velocity at the discharge point to prevent new erosion at the outlet |
| Shovel (optional) | Needed only if you're burying a drainage extension underground |
Step-by-Step: Installing a Standard Downspout Extender
Step 1: Assess the Grading Around Your Foundation
Before attaching anything, look at how the ground slopes near each downspout. Ideally, soil should slope away from your home at a rate of about one inch per foot for at least six feet. If the ground slopes toward the house instead, an extender alone won't solve the problem completely, and you may need to add fill dirt to correct the grade first. Note this now so you know how far your extension needs to reach.
Step 2: Measure the Downspout Outlet
Most residential downspouts come in two standard sizes: 2x3 inches or 3x4 inches. Measure the bottom opening of your downspout with a tape measure so you purchase an extender that fits snugly without needing an adapter. If your home has an unusual or custom gutter system, bring the measurements with you to the store, or better yet, snap a photo of the outlet shape.
Step 3: Choose the Right Type of Extender
There are three main styles to pick from, and each suits a different situation:
- Rigid aluminum or vinyl extenders are the most affordable and easiest to install, but they sit on top of the lawn, which means they can get bumped by lawnmowers or kicked out of place by kids and pets.
- Flexible corrugated extenders can bend around landscaping, garden beds, or walkways, making them ideal for yards with obstacles between the downspout and the desired discharge point.
- Roll-out or automatic extenders stay coiled up against the house until water flow pushes them open, then retract when the rain stops. These are the best choice if you mow close to your foundation and don't want a permanent object in the grass.
Step 4: Cut the Extender to Length
Water should discharge at least four to six feet away from your foundation, and further if your yard is flat or slopes toward the house. Measure this distance, then use tin snips or a hacksaw to trim the extender so it reaches that point without excess overhang that could get crushed. Cut slowly and file down any sharp edges left behind, since these can snag hands or mower blades later.
Advertisement
Step 5: Attach the Extender to the Downspout
Slide the wide end of the extender over the bottom of the downspout so it overlaps by about two inches. Line up the seams so the extender sits flush against the downspout's shape. Drill two or three self-tapping sheet metal screws through both layers to lock the connection in place. If you'd rather avoid drilling, heavy-duty outdoor tape or a snap-lock connector can work as a temporary fix, though screws hold up far better through wind and freezing temperatures.
Step 6: Position and Secure the Discharge End
Once attached, angle the extender so it points away from the house and toward a spot where water can disperse safely, such as a lawn area, garden bed, or storm drain. Place a splash block or small paver underneath the discharge point. This simple addition spreads the water out and prevents a new erosion channel from forming exactly where the extender ends.
Step 7: Test With a Hose
Run a garden hose into the top of the downspout to simulate rainfall and watch where the water travels. Confirm it flows smoothly through the extender and discharges well away from the foundation without pooling or backing up. Adjust the angle or add a second splash block if needed.
Going Further: Burying a Downspout Drainage Extension
If you don't like the look of extenders lying across your lawn, or if you need to route water a longer distance, burying a corrugated or PVC drain pipe underground is the next step up. Dig a trench roughly six to eight inches deep sloping gently away from the house, lay perforated or solid drain pipe connected to your downspout via an underground adapter, and run it to a "pop-up" emitter at the far end. The emitter sits flush with the lawn and opens under water pressure to release flow, then closes again once drainage stops. This method keeps your yard looking tidy year-round while still protecting the foundation.
Maintenance Tips to Keep Your System Working
- Check extenders each spring and fall for cracks, disconnections, or clogs from leaves and debris
- Clear gutters at least twice a year so extenders aren't overwhelmed by backed-up water during heavy storms
- Reposition rigid extenders if lawn mowing has knocked them out of place
- Inspect buried drainage lines for sediment buildup every couple of years by flushing them with a hose
- After any major storm, walk the foundation perimeter to confirm water is still draining away properly
Final Thoughts
Foundation erosion is one of those slow, quiet problems that can turn into a five-figure repair bill if it's ignored long enough. The good news is that preventing it doesn't require a contractor, a permit, or a weekend of hard labor. A properly installed downspout extender redirects water where it belongs, protects the soil that supports your home, and gives you peace of mind every time it rains. Spend an afternoon walking your property, sizing up your downspouts, and installing extenders on each one, and you'll have taken one of the most effective steps possible toward protecting your home's foundation for years to come.
Disclaimer, No Liability: The authors and publishers of this website are not professional contractors and assume no liability or responsibility for any injury, damage, or financial loss resulting from the use or misuse of the information provided herein. All DIY projects are undertaken entirely at your own risk.
Related Articles
Advertisement
How to Install Downspout Extenders to Prevent Foundation Erosion: Step-by-Step DIY Guide | Tricks and Tips for Life
Comments and Questions
Please log in to leave a comment or ask a question. Don't have an account? Register here.