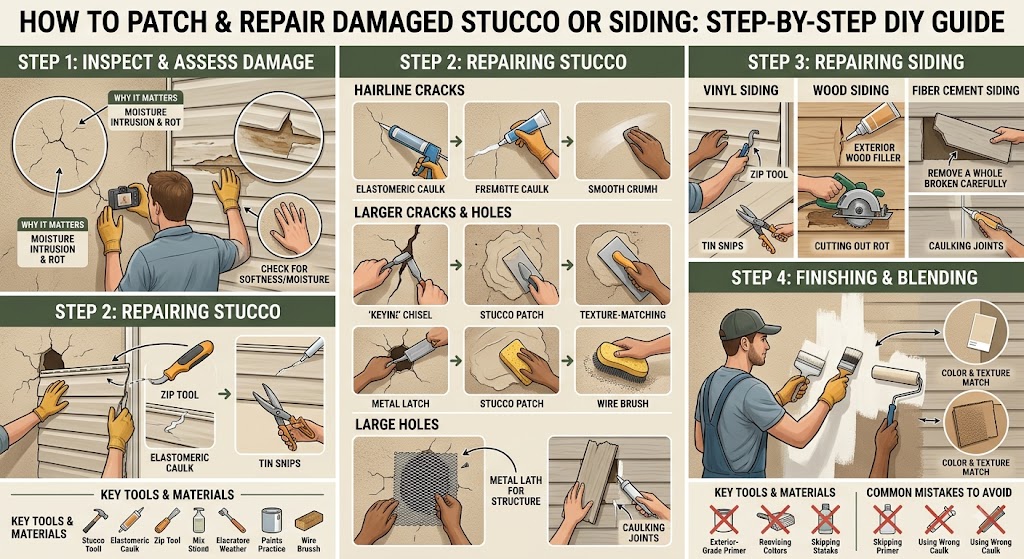
How to Patch and Repair Damaged Stucco or Siding: Step-by-Step DIY Guide | Tricks and Tips for Life
How to Patch and Repair Damaged Stucco or Siding: Step-by-Step DIY Guide
Learn how to patch and repair damaged stucco or siding yourself with this detailed step-by-step DIY guide covering tools, materials, techniques, and pro tips.
Home » Article » Diy » How To Patch And Repair Damaged Stucco Or Siding Step By Step Diy Guide
There's a particular kind of dread that sets in when you're mowing the lawn or washing the car and you spot it — a spiderweb crack creeping across your stucco wall, or a chunk of siding hanging loose after last week's storm. Your first thought is probably "how much is this going to cost me?" Here's some good news: in a lot of cases, you can fix these problems yourself over a weekend, without hiring a contractor or draining your savings account.
This guide walks through exactly how to repair both stucco and siding damage, from the small hairline cracks that seem harmless (but aren't) to bigger holes and gaps that let water sneak behind your walls. We'll cover the tools, the materials, the actual technique, and the mistakes that trip up almost every first-timer.
Why You Shouldn't Ignore Small Cracks and Gaps
It's tempting to look at a thin crack and think, "eh, it's just cosmetic." Unfortunately, that's rarely true. Both stucco and siding are essentially the outer shell protecting your home's structure, insulation, and interior walls from moisture. Once water finds a way in — even through a crack thinner than a credit card — it can travel behind the surface, soak into sheathing, rot wood framing, and eventually cause mold growth you won't see until it's a serious (and expensive) problem.
The rule of thumb among contractors is simple: small repairs cost dollars, ignored repairs cost thousands. Catching damage early and patching it yourself is one of the most cost-effective things a homeowner can do.
Tools and Materials You'll Need
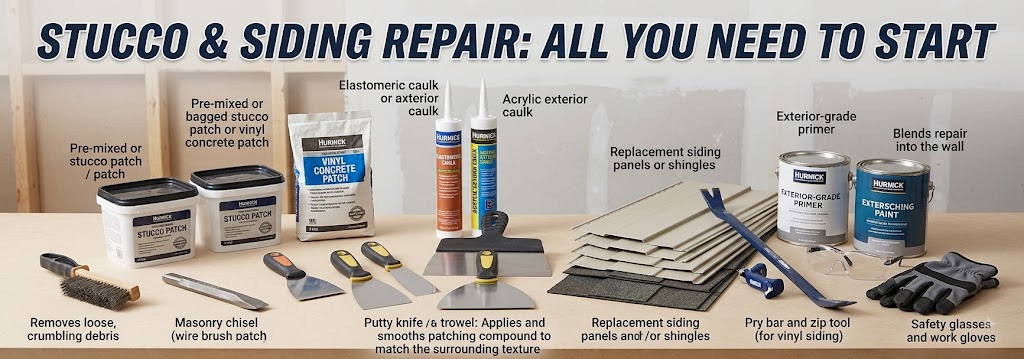
Before you start chipping away at anything, gather your supplies. Running back and forth to the hardware store mid-project is a great way to lose motivation.
| Item | Why You Need It |
|---|---|
| Wire brush or masonry chisel | Removes loose, crumbling stucco or debris so new patch material can bond properly |
| Pre-mixed or bagged stucco patch / vinyl concrete patch | The actual repair compound used to fill cracks and holes |
| Elastomeric caulk or acrylic exterior caulk | Seals hairline cracks and gaps around siding seams and trim |
| Putty knife and trowel (various sizes) | Applies and smooths patching compound to match the surrounding texture |
| Replacement siding panels or shingles | Needed if a section of siding is cracked, warped, or missing entirely |
| Pry bar and zip tool (for vinyl siding) | Removes damaged panels without cracking the surrounding boards |
| Exterior-grade primer and matching paint | Blends the repair into the rest of the wall so it doesn't stand out |
| Safety glasses and work gloves | Protects your eyes and hands from debris, wire mesh, and dried compound |
Most of these items are available at any home improvement store, and none of them require special ordering unless you're trying to match an unusual siding color or a stucco texture that's no longer manufactured (more on that below).
Step 1: Figure Out Exactly What You're Dealing With
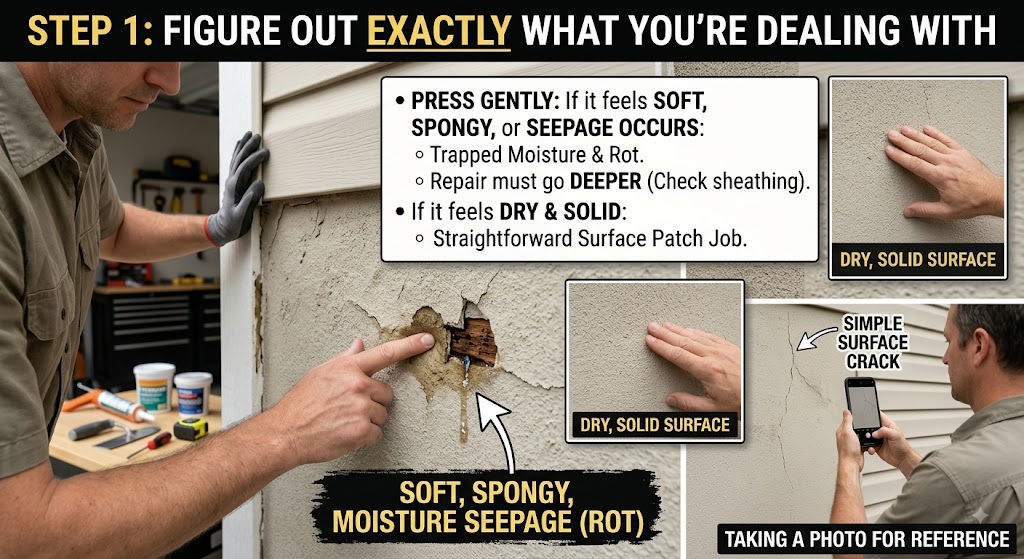
Not all damage is created equal, and treating a structural problem like a cosmetic one is where DIY repairs go sideways. Walk around your home and inspect the damaged area closely. Press on it gently. Does it feel soft, spongy, or does water seep out when pressed? That's a sign of trapped moisture and possible rot underneath, which means the repair needs to go deeper than a simple patch — you may need to pull back the siding or stucco entirely and check the sheathing underneath.
If the area is dry, solid, and the damage is limited to the surface (a crack, a small hole, a dented or cracked panel), you're in good shape for a straightforward patch job. Take a photo of the damage before you start. It's genuinely helpful later when you're trying to match paint color or texture.
Advertisement
Step 2: Repairing Cracked or Damaged Stucco
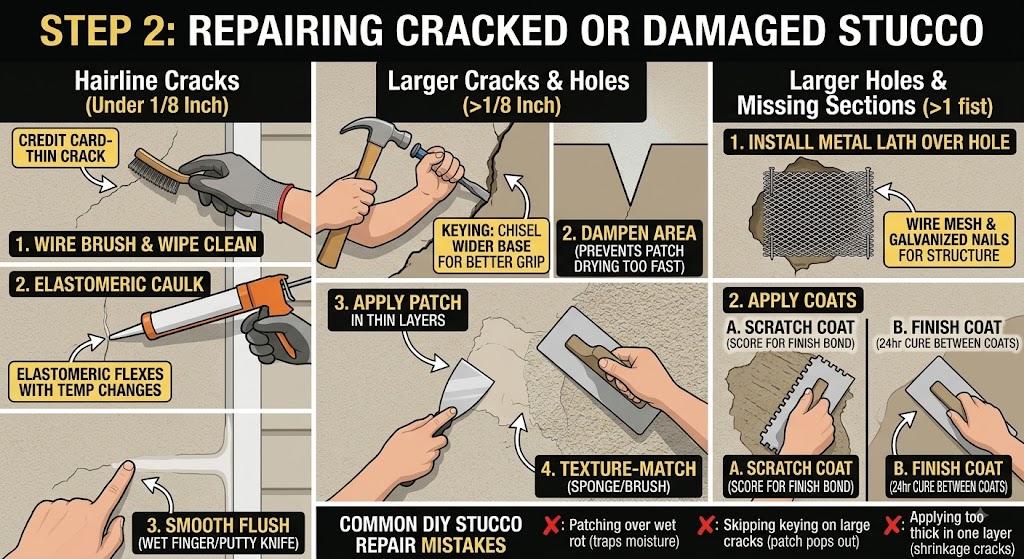
Stucco cracks happen for a bunch of reasons — the house settling, temperature swings expanding and shrinking the material, or simply age. Here's how to fix them properly.
Hairline Cracks (Under 1/8 Inch)
These are the easiest fix. Clean the crack out with a wire brush to remove any loose debris or old caulk, then wipe it down with a damp cloth so it's dust-free. Apply a bead of elastomeric caulk directly into the crack using a caulking gun, then smooth it with a wet finger or a small putty knife so it sits flush with the surrounding surface. Elastomeric caulk is worth the extra couple dollars over regular acrylic caulk because it flexes with temperature changes instead of cracking again next season.
Larger Cracks and Holes
For anything wider than an eighth of an inch, caulk alone won't cut it — you need an actual patching compound. Start by widening the crack slightly with a chisel or the corner of a putty knife, angling inward so the base of the crack is wider than the surface opening. This "keying" technique gives the patch material something to grip onto instead of just sitting on top and eventually popping out.
Clean out all the loose material, dampen the area with water (dry stucco will suck the moisture out of your patch too fast, causing it to crack again), and then apply your patching compound with a putty knife, pressing firmly into the crack. Build it up in thin layers rather than one thick glob — this prevents shrinkage cracks as it dries. Once it's roughly level with the surrounding wall, use a trowel or a damp sponge to texture-match the surface. If your stucco has a specific pattern (swirl, dash, sand finish), you may need to dab or swirl the wet compound with a brush or sponge to mimic it before it fully sets.
Larger Holes or Missing Sections
If you're dealing with a hole bigger than a fist, you'll likely need to install a small piece of metal lath (a wire mesh) over the opening first, securing it to the sheathing with galvanized nails or screws. This gives the new stucco something structural to bond to. Apply your patch in two coats — a scratch coat first, scored lightly with a notched trowel once it's partially dry, followed by a finish coat once the first has cured for at least 24 hours. This layered approach is exactly how professional stucco crews build up new sections, just on a smaller scale.
Step 3: Repairing Damaged Siding
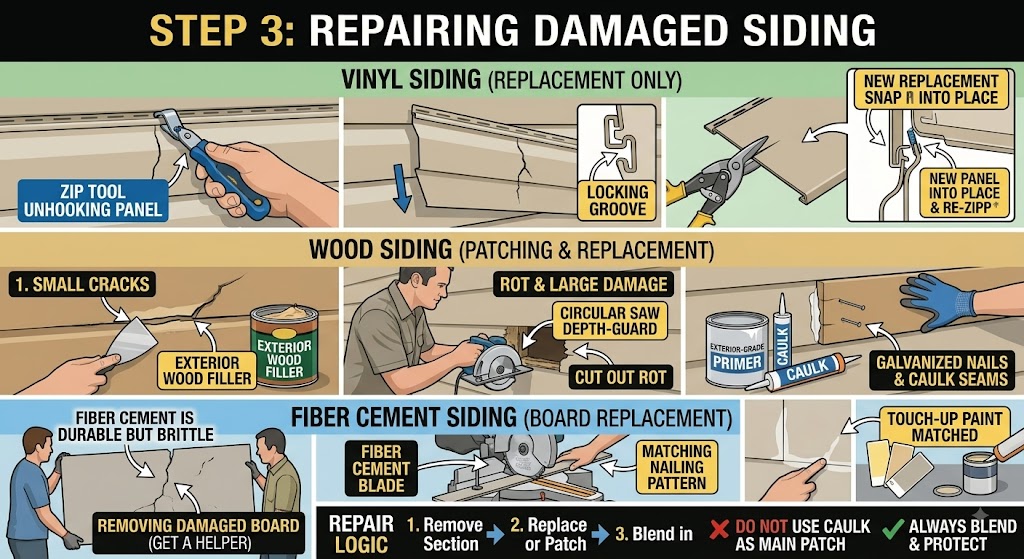
Siding repair looks different depending on the material — vinyl, wood, or fiber cement each behave differently — but the general process follows a similar logic: remove the damaged section, replace or patch it, and blend it in.
Vinyl Siding
Cracked or punctured vinyl panels are usually not worth patching — vinyl doesn't take adhesive repairs well and any patch will be visible. Instead, replace the damaged section. Use a zip tool (a cheap, specialized tool made exactly for this job) to unhook the damaged panel from the one above it. Slide it down and out from where it interlocks with the panels around it. Cut a new matching piece to size using tin snips, snap it into place, and zip the panel above back into its locking groove. If you don't have a leftover piece from the original installation, check with the manufacturer or a local siding supplier — many popular vinyl colors and profiles stay in production for years.
Wood Siding
For small cracks or splits in wood siding, exterior wood filler works well. Clean out the crack, apply the filler with a putty knife, let it cure according to the product's instructions, then sand it smooth once dry. For rot or larger damage, cut out the affected board entirely using a circular saw set to the depth of the siding thickness (to avoid cutting into the sheathing behind it), and slide in a new matching board, securing it with galvanized siding nails. Always caulk the seams afterward and prime any bare wood before painting — unprimed wood siding will start absorbing moisture again almost immediately.
Fiber Cement Siding
Fiber cement is durable but brittle, so cracks usually mean the board needs replacing rather than patching. Remove the damaged board carefully (it's heavier than wood or vinyl, so have a helper if possible), cut the replacement to size with a fiber cement blade, and nail it into place following the same nailing pattern as the surrounding boards. Caulk all joints and touch up with paint matched to the rest of the exterior.
Advertisement
Step 4: Blend the Repair So It Doesn't Stand Out
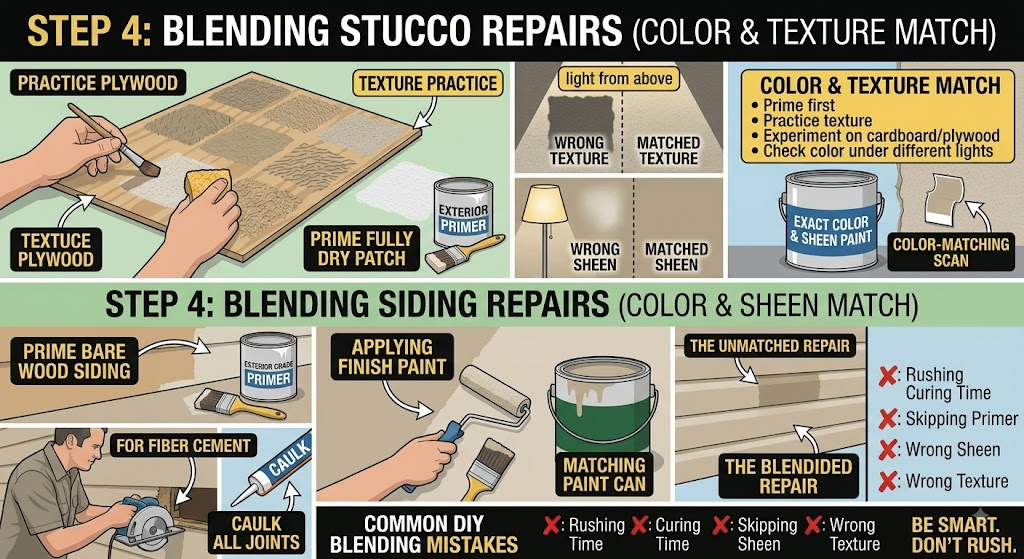
This is the step people rush through and immediately regret. A technically solid patch that looks like a patch is still going to bother you every time you glance at that wall. Once your repair material has fully cured (check the product label — this can range from a few hours to a couple of days), prime the area with an exterior-grade primer suited to the material. Let that dry fully, then paint using the exact sheen and color of your existing exterior. If you don't have leftover paint from the original job, bring a small chip or photo to a paint store that offers color matching — most can get remarkably close using a spectrophotometer scan.
For stucco specifically, texture matching matters just as much as color. A perfectly painted patch with the wrong texture will still catch the eye in certain light. Take your time experimenting with a scrap piece of cardboard or plywood to practice your texture technique before committing to the actual wall.
Common Mistakes That Undermine a DIY Repair
| Mistake | Why It Causes Problems |
|---|---|
| Patching over wet or rotted material | Trapped moisture continues damaging the structure underneath, and the new patch will fail quickly |
| Skipping the primer coat | Paint won't adhere evenly, leading to peeling and a mismatched, blotchy appearance |
| Applying patch material too thick in one layer | Causes shrinkage cracking as it dries, meaning you'll be redoing the repair soon |
| Ignoring the underlying cause of the damage | If a sprinkler is constantly hitting the wall or a gutter is overflowing, the new patch will fail the same way the old one did |
| Using the wrong caulk type | Non-elastomeric caulk cracks again with normal seasonal expansion and contraction |
When It's Time to Call a Professional
DIY repair is great for isolated, surface-level damage. But there are a few situations where bringing in a professional makes more sense than pushing through on your own. If you find soft or rotted sheathing behind the stucco or siding, if the damage covers a large area (more than a few square feet), if you notice damage near electrical outlets or wiring penetrations, or if your home has synthetic stucco (EIFS) rather than traditional stucco, it's worth getting a professional opinion. EIFS systems are layered differently than traditional stucco and improper repairs can trap moisture in ways that cause serious hidden damage.
There's no shame in tackling the easy 80% of repairs yourself and handing off the trickier 20% to someone with the right experience. That's not failure — that's just being smart about where your time and money are best spent.
Final Thoughts
Patching stucco or siding isn't glamorous work, but it's one of those tasks that pays for itself many times over. A few hours with a trowel and some patience now can prevent thousands of dollars in structural repairs down the road. Start small, work carefully, let each step fully cure before moving to the next, and don't rush the finishing touches. Your future self — and your home's curb appeal — will thank you.
Disclaimer, No Liability: The authors and publishers of this website are not professional contractors and assume no liability or responsibility for any injury, damage, or financial loss resulting from the use or misuse of the information provided herein. All DIY projects are undertaken entirely at your own risk.
Related Articles
Advertisement
How to Patch and Repair Damaged Stucco or Siding: Step-by-Step DIY Guide | Tricks and Tips for Life
Comments and Questions
Please log in to leave a comment or ask a question. Don't have an account? Register here.