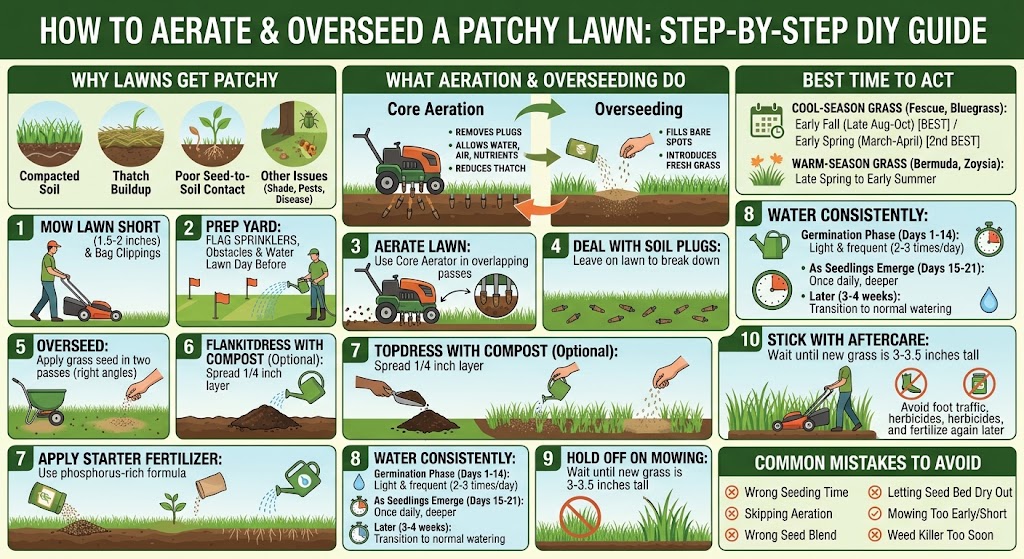
How to Aerate and Overseed a Patchy Lawn: Step-by-Step DIY Guide | Tricks and Tips for Life
How to Aerate and Overseed a Patchy Lawn: Step-by-Step DIY Guide
Transform your yard with this DIY guide to aerating and overseeding a patchy lawn. Covers everything from timing and tools to watering and aftercare.
Home » Article » Diy » How To Aerate And Overseed A Patchy Lawn Step By Step Diy GuideIf your lawn looks more like a checkerboard than a carpet — thick and green in some spots, bare and dusty in others — you're not alone. Patchy lawns are one of the most common complaints homeowners have, and the good news is that fixing one doesn't require ripping everything out and starting over. In most cases, a weekend spent aerating and overseeding will do more for your yard than a whole summer of fertilizer and watering ever could.
This guide walks through the entire process from start to finish, the way you'd actually do it in your own backyard: what to check before you begin, which tools are worth renting versus buying, how to actually run an aerator without wrecking your sprinkler heads, and how to keep those new seedlings alive long enough to turn into real grass. Grab a cup of coffee, because we're covering everything.
Why Lawns Get Patchy in the First Place
Before you spend a weekend fixing your lawn, it helps to know why it went patchy to begin with. Otherwise you might do the work and watch the same bald spots come right back next season. A few usual suspects:
- Compacted soil. Years of foot traffic, mowing, kids playing, or dogs running the same path packs the soil down so tightly that air, water, and nutrients can't reach the roots. Grass thins out and eventually gives up.
- Thatch buildup. That spongy brown layer of dead grass and roots sitting between the soil and the green blades can choke out new growth if it gets thicker than about half an inch.
- Poor seed-to-soil contact. Grass seed that lands on top of hard, compacted dirt mostly just blows away or gets eaten by birds. It needs to nestle into loose soil to germinate.
- Shade, drainage, or soil quality issues. Some patches simply get less sun, hold too much water, or sit on poor-quality fill dirt from construction.
- Disease, grubs, or old age. Fungal issues, insect damage, or grass that's simply worn out after years of stress can leave permanent bare spots if nothing is reseeded.
Aeration solves the compaction and thatch problems by physically pulling small plugs of soil out of the ground. Overseeding solves the bare-spot problem by introducing fresh seed into that now-loosened soil. Do them together, and each one makes the other work better.
What Aeration and Overseeding Actually Do
Core aeration uses a machine (or manual tool) with hollow tines that punch into the ground and pull out small plugs of soil, usually about 2 to 3 inches deep and roughly the size of your finger. This isn't just poking holes for the sake of it — those holes let oxygen, water, and fertilizer travel down to the root zone instead of sitting on the surface or running off. It also gives roots room to spread out instead of fighting through compacted dirt.
Overseeding means spreading new grass seed over an existing lawn rather than tearing everything up and starting from bare soil. The holes left behind by aeration act like tiny seed pockets — instead of seed sitting exposed on top of hard ground where it dries out or blows away, it falls into loosened soil with much better contact and protection. That's why the two jobs are almost always done back-to-back rather than as separate projects.
When Is the Best Time to Aerate and Overseed?
Timing genuinely makes or breaks this project. Seed sown at the wrong time of year either won't germinate at all or will sprout right before a frost or heat wave kills it off. The right window depends heavily on what type of grass you're growing.
| Grass Type | Best Time to Aerate & Overseed | Why This Window Works |
|---|---|---|
| Cool-season (fescue, bluegrass, ryegrass) | Early fall (late August to early October) | Soil is still warm enough for fast germination, air temps are cooler, and there's less weed competition than in spring. |
| Cool-season (fescue, bluegrass, ryegrass) | Second choice: early spring (March to April) | Works, but new seedlings have to compete with summer heat and crabgrass before they're fully established. |
| Warm-season (Bermuda, zoysia, St. Augustine) | Late spring to early summer | These grasses are actively growing and spreading in warm soil, which helps new seed root quickly. |
| Any grass type | Avoid: right before a hard frost or during peak summer heat | Extreme cold kills young seedlings before roots establish; extreme heat dries seed out faster than it can sprout. |
If you're not sure what kind of grass you have, take a close look at the blade shape and check with a local garden center — most cool-season lawns dominate the northern half of the country, while warm-season grasses take over in the South, with a "transition zone" in the middle where either can grow.
Signs Your Lawn Actually Needs This Treatment
Not every patchy lawn needs aeration — sometimes the fix is simpler, like adjusting a sprinkler or dealing with a shady tree. Here's how to tell if compaction and thin turf are really the culprit:
- Water pools on the surface instead of soaking in after rain or watering.
- A screwdriver or garden fork is hard to push more than an inch or two into the soil.
- The thatch layer (that brown, spongy stuff at the soil surface) feels thicker than about half an inch.
- Grass looks thin, pale, or stressed in high-traffic areas like near a mailbox, gate, or play area.
- You haven't aerated in the last one to two years, or ever.
Advertisement
Tools and Materials You'll Need
| Item | What It's For |
|---|---|
| Core aerator | Pulls plugs of soil to relieve compaction. Rent a walk-behind gas model from a hardware or equipment rental store for anything larger than a small yard; hand aerators work fine for small patches. |
| Grass seed (matched to your existing lawn) | The actual seed you'll spread into the aerated soil. Buy a blend that matches your current grass type so the color and texture stay consistent. |
| Broadcast or drop spreader | Distributes seed and fertilizer evenly. A broadcast (rotary) spreader is faster and works well for most yards. |
| Starter fertilizer | A phosphorus-heavy formula made specifically for new seed, which encourages strong root development. |
| Compost or peat moss (optional) | A thin topdressing layer that helps hold moisture around the seed and improves soil quality over time. |
| Lawn mower with a bag attachment | For mowing the lawn short before you begin and bagging the clippings so they don't smother new seed. |
| Garden hose or sprinkler | Keeps the seed bed consistently moist during germination, which usually takes one to three weeks depending on grass type. |
| Flags or marking paint | Marks the location of sprinkler heads, shallow utility lines, and septic components so the aerator doesn't hit them. |
Step-by-Step: How to Aerate and Overseed Your Lawn
Step 1: Mow the Lawn Short
Start by mowing your lawn shorter than you normally would — around 1.5 to 2 inches — and bag the clippings instead of leaving them on the grass. This isn't just tidying up. Shorter grass means the aerator tines can actually reach the soil instead of getting tangled in long blades, and it also means new seed has a clear path to reach the dirt instead of getting trapped in a thick canopy of grass above it.
Step 2: Prep the Yard Before You Aerate
Walk the entire yard and flag anything that shouldn't get punctured — sprinkler heads, invisible dog fence wires, shallow irrigation lines, and septic tank lids are the usual culprits. Clear away sticks, toys, or other debris while you're at it.
Then water the lawn thoroughly the day before you plan to aerate, unless it's already rained recently. Aerators pull much cleaner, deeper plugs out of moist soil than they do out of dry, hard-packed dirt. If the ground is bone dry, you'll end up with an aerator that barely dents the surface.
Step 3: Aerate the Lawn
This is the step people most often get wrong, usually by using the wrong tool. Spike aerators — the kind with solid metal spikes that just poke holes — actually make compaction worse over time because they push soil sideways and pack it even tighter around the hole. A core aerator, which physically removes a plug of soil and drops it on the surface, is what you want. You can rent a gas-powered walk-behind core aerator from most home improvement or equipment rental stores for a day, which is usually enough time for an average residential lot.
Push the aerator in overlapping passes across the whole lawn, similar to how you'd mow. For lawns that are especially compacted or heavily patchy, go over the area a second time in a crisscross direction — first north to south, then east to west. You're aiming for roughly 20 to 40 holes per square foot by the time you're done, which sounds like a lot but is exactly what encourages good seed germination. Don't worry about making the lawn look perfect at this stage; it's supposed to look a little rough.
Step 4: Deal With the Soil Plugs
Once you're finished, you'll see the lawn covered in small soil plugs. The easiest approach, and honestly the best one, is to just leave them where they are. Over the next two to three weeks, rain, watering, and mowing will break them down naturally and work that soil back into the lawn, which actually helps improve the topsoil. If you really don't like the look of them, you can rake them up and toss them in a compost pile, but there's no real horticultural benefit to removing them.
Step 5: Overseed the Patchy and Thin Areas
Now comes the part that actually fixes those bare patches. Load your spreader with grass seed that matches your existing lawn type, and set it according to the "overseeding" rate listed on the bag — this is typically about half the rate you'd use for seeding bare soil from scratch, since you're filling in an existing lawn rather than starting fresh.
Spread seed in two passes at right angles to each other (one pass north-south, one pass east-west) to get even coverage without gaps or stripes. For the truly bald, patchy spots, go back over them by hand and add extra seed directly — those areas need a heavier application since there's no existing grass helping to fill in around new seedlings. A light rake pass over heavily seeded bare patches helps work seed down into the aeration holes rather than leaving it sitting exposed on the surface.
Step 6: Topdress With Compost (Optional but Worth It)
If you want to give the new seed an extra advantage, spread a thin layer of screened compost or peat moss over the entire lawn — no more than a quarter inch thick, which is thin enough that you can still see grass blades poking through. This layer holds moisture close to the seed, moderates soil temperature, and adds organic matter to the soil as it breaks down. It's not strictly necessary, but it noticeably speeds up germination and reduces how often you need to water.
Step 7: Apply a Starter Fertilizer
Skip whatever "weed and feed" product you might normally use — those contain herbicides that will kill grass seedlings right along with the weeds. Instead, use a starter fertilizer specifically formulated for new seed, which is usually higher in phosphorus to support strong root growth. Run it through your spreader at the rate listed on the bag, right after you've finished seeding.
Step 8: Water Consistently (This Is the Step Most People Get Wrong)
Grass seed that dries out even once during germination can die, so the watering schedule matters more than almost anything else in this whole process. Here's roughly how it should go:
- Days 1–14 (germination phase): Water lightly, two to three times per day, just enough to keep the top inch of soil consistently moist — think damp sponge, not swamp. Short 5 to 10 minute sessions work better than one long soak.
- Days 15–21 (as seedlings emerge): Start cutting back to once a day, watering a little longer each time to encourage roots to grow deeper rather than staying near the surface.
- After about 3–4 weeks: Transition to your lawn's normal watering routine — typically a deep watering two to three times a week rather than daily, which trains roots to grow down instead of relying on constant surface moisture.
Watering in the early morning is best, since it gives the grass all day to dry out and reduces the risk of fungal problems that come from leaving seed damp overnight.
Step 9: Hold Off on Mowing Until the Grass Is Ready
Resist the urge to mow as soon as you see green fuzz coming in. Wait until the new grass reaches about 3 to 3.5 inches tall, then mow it down to around 3 inches — never take off more than the top third of the blade in a single cut, and make sure your mower blade is freshly sharpened so it cuts cleanly instead of tearing young, shallow-rooted seedlings out of the ground.
Step 10: Stick With the Aftercare
The lawn isn't done working once the seed sprouts. For the first six to eight weeks:
- Keep foot traffic, pets, and mowers off the newly seeded areas as much as possible.
- Hold off on any herbicide application — even "weed killers safe for lawns" can stunt or kill new grass seedlings.
- Hand-pull any obvious weeds rather than spraying them.
- Apply a second light round of fertilizer about four to six weeks after seeding to keep new growth fed as it matures.
Advertisement
Common Mistakes That Ruin Overseeding Results
- Seeding at the wrong time of year. Beautiful seed spread in the middle of July heat or right before the first frost simply won't survive long enough to establish.
- Skipping aeration entirely. Seed thrown on top of compacted soil mostly just sits there until it washes away or gets eaten by birds.
- Buying the wrong seed blend. Mixing a sun-loving seed into a shady yard, or a different grass species than what's already growing, leads to patchy color and texture even after it fills in.
- Letting the seed bed dry out, even once. A single missed watering day during the first two weeks can kill a huge percentage of newly sprouted seedlings.
- Mowing too early or too short. Cutting young grass before it's rooted in pulls seedlings right out of the ground.
- Applying weed killer too soon after seeding. Most pre-emergent and broadleaf herbicides need to be kept away from the lawn for six to eight weeks after new seed goes down.
How Long Until You Actually See Results?
Patience is a real part of this project. Germination speed depends heavily on which seed you used:
| Seed Type | Typical Days to Germinate | Approx. Time to First Mow |
|---|---|---|
| Perennial ryegrass | 5–10 days | 2–3 weeks |
| Tall fescue | 7–14 days | 3–4 weeks |
| Kentucky bluegrass | 14–30 days | 4–6 weeks |
| Bermuda grass | 10–30 days | 3–5 weeks |
| Zoysia grass | 14–21 days | 4–6 weeks |
Full, thick coverage usually takes a full growing season to really show off, so don't judge the results too harshly after just three or four weeks. A lawn that looks like a light green haze at the one-month mark can easily fill in completely by the time next season rolls around.
Frequently Asked Questions
Can I aerate and overseed on the same day?
Yes — in fact, that's the recommended approach. Doing them back-to-back means the seed falls directly into freshly opened holes while the soil is still loose, which gives you far better results than doing either task on its own.
Do I really need to rent a machine, or can I aerate by hand?
For a small yard or a few isolated patches, a manual core aerator (basically a two-pronged fork you step on and pull) works fine and saves you a rental fee. For anything larger than a small yard, a gas-powered walk-behind aerator will save your back and get the job done in a fraction of the time.
How often should a lawn be aerated?
Once a year is plenty for most lawns, ideally done at the start of the season your grass grows best in. Lawns with heavy clay soil or lots of foot traffic can benefit from aerating twice a year.
Can I overseed without aerating first?
You can, but you'll get noticeably weaker results, especially on compacted soil. Seed needs good contact with loose dirt to germinate reliably — without aeration, a lot of it just sits on the surface and never takes root.
What's the real difference between overseeding and reseeding a lawn?
Overseeding means adding new seed into an existing, mostly healthy lawn to thicken it up and fill in bare spots. Reseeding (or renovating) usually means killing off most or all of the existing grass first and starting over from bare soil — a much bigger job reserved for lawns that are more dead than alive.
Final Thoughts
Aerating and overseeding isn't glamorous work, and it definitely involves some sweat, a rented machine, and a few weeks of patient watering. But of everything you can do for a patchy, tired-looking lawn, this combination consistently delivers the biggest visible improvement for the effort involved. Pick the right week on the calendar, follow the watering schedule without skipping days, and by the time next season rolls around, those bare patches will just be a memory.
Disclaimer, No Liability: The authors and publishers of this website are not professional contractors and assume no liability or responsibility for any injury, damage, or financial loss resulting from the use or misuse of the information provided herein. All DIY projects are undertaken entirely at your own risk.
Related Articles
Advertisement
How to Aerate and Overseed a Patchy Lawn: Step-by-Step DIY Guide | Tricks and Tips for Life
Comments and Questions
Please log in to leave a comment or ask a question. Don't have an account? Register here.