How to Edge Garden Beds with Stone or Brick: Step-by-Step DIY Guide | Tricks and Tips for Life
How to Edge Garden Beds with Stone or Brick: Step-by-Step DIY Guide
Learn how to edge garden beds with stone or brick. Follow our easy step-by-step DIY guide for tools, trenching, and leveling to build a crisp, lasting border!
Home » Article » Diy » How To Edge Garden Beds With Stone Or Brick Step By Step Diy GuideThere's a moment in every gardener's journey when the flower beds start creeping into the lawn, mulch scatters across the sidewalk after every storm, and the grass edges look more like a ragged coastline than a clean line. That's usually the sign it's time to install a proper edge. A stone or brick border isn't just about looks, either. It physically stops grass roots from invading your beds, keeps mulch and soil where they belong, and gives your whole yard that finished, intentional look that separates a "nice yard" from a "wow, who landscaped this?" yard.
The good news is that edging a garden bed with stone or brick is one of the most beginner-friendly landscaping projects you can tackle. You don't need power tools, a truckload of expensive materials, or a weekend course in masonry. What you do need is patience, a little muscle, and a clear plan. This guide walks through the entire process from start to finish, including the mistakes most first-timers make so you can skip right past them.
Why Bother Edging Your Garden Beds at All?
Before grabbing a shovel, it helps to understand what a good edge actually does for your landscape. Grass is relentless. Left unchecked, it will send runners and rhizomes straight into your mulch beds, and before long you're pulling grass out of your flower bed every single weekend. A solid physical barrier, whether it's stacked stone or a row of brick set on end, creates a boundary that roots can't easily cross.
Beyond function, edging also acts like a picture frame for your landscaping. Even a modest flower bed looks more polished when it's outlined cleanly. It creates contrast between the lawn and the planting area, which makes both look more deliberate and cared for. And practically speaking, a raised edge helps hold mulch, gravel, or soil in place so it doesn't wash out onto the driveway or sidewalk every time it rains hard.
Choosing Between Stone and Brick
Both materials get the job done, but they have different personalities. Natural stone, whether it's fieldstone, river rock, or cut pavers, tends to look more organic and blends well with cottage-style or naturalistic gardens. Brick has a crisper, more formal appearance and pairs nicely with traditional homes or geometric bed shapes.
| Material | Best Suited For |
|---|---|
| Fieldstone | Casual, natural-looking gardens; irregular shapes; woodland or cottage-style beds where a rustic feel is desired. |
| Cut Stone Pavers | Modern or formal layouts where you want clean lines and a consistent, uniform edge. |
| Standard Clay Brick | Traditional homes, straight or gently curved beds, and anyone wanting a classic, tidy border. |
| Concrete Paver Brick | Budget-friendly projects needing a uniform look with more color and shape options than clay brick. |
| River Rock | Beds near water features or dry creek beds, and anywhere a smooth, rounded texture fits the theme. |
Cost also plays a role. Brick and cut pavers are usually sold by the piece or by the pallet, making it easy to calculate exactly how much you need. Natural fieldstone is often sold by the ton, and because pieces vary in size, you'll typically want to buy a bit extra to account for gaps and odd shapes.
Advertisement
Tools and Materials You'll Need
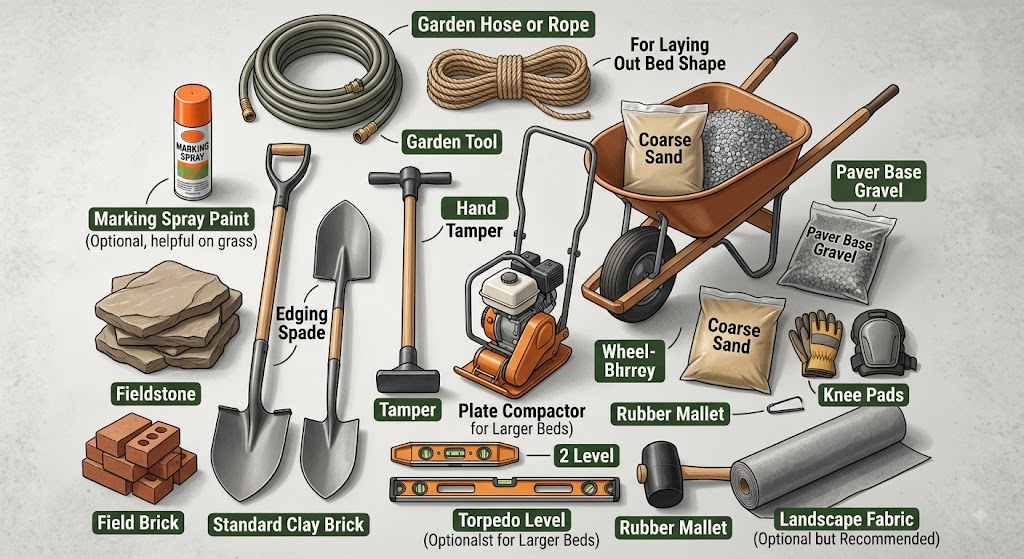
Gathering everything before you start saves you multiple trips back to the store mid-project, which is one of the most common frustrations with DIY edging jobs.
- Garden hose or rope (for laying out the bed shape)
- Spray paint made for marking (optional, but helpful on grass)
- Flat shovel or edging spade
- Hand tamper or plate compactor for larger beds
- Rubber mallet
- Torpedo level and a longer 2-foot level
- Landscape fabric (optional but recommended)
- Coarse sand or paver base gravel
- Your chosen stone or brick
- Work gloves and knee pads
- Wheelbarrow for moving materials
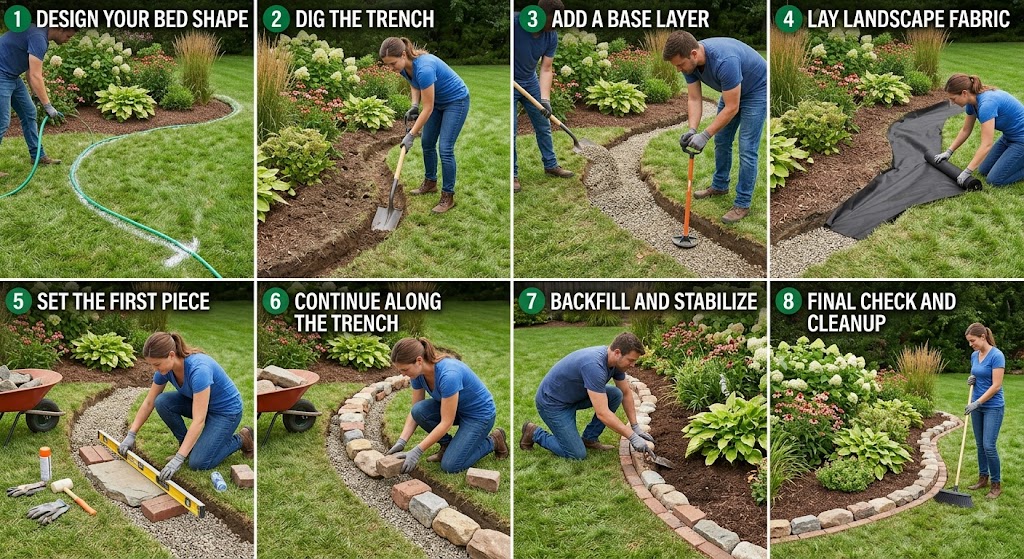
Step-by-Step: Installing Stone or Brick Edging
Step 1: Design Your Bed Shape
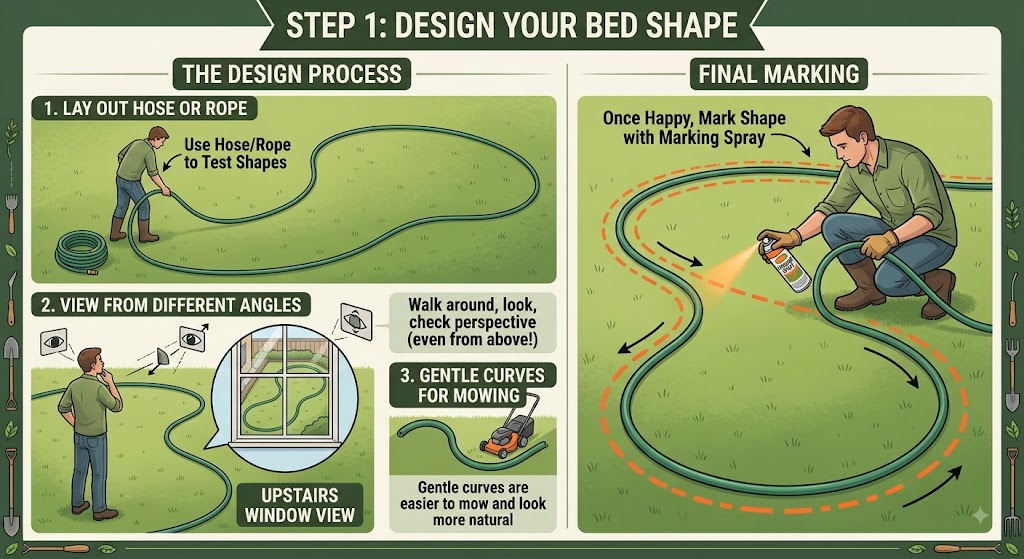
Grab a garden hose or a length of rope and lay it out on the ground where you want your bed's edge to sit. This is the single easiest way to test different shapes without committing to anything. Walk around it, look at it from a few angles, maybe even glance at it from an upstairs window if you have one. Gentle curves tend to look more natural than sharp angles, and they're also easier to mow around later. Once you're happy with the shape, mark it with marking spray so the line stays visible even after you move the hose.
Step 2: Dig the Trench
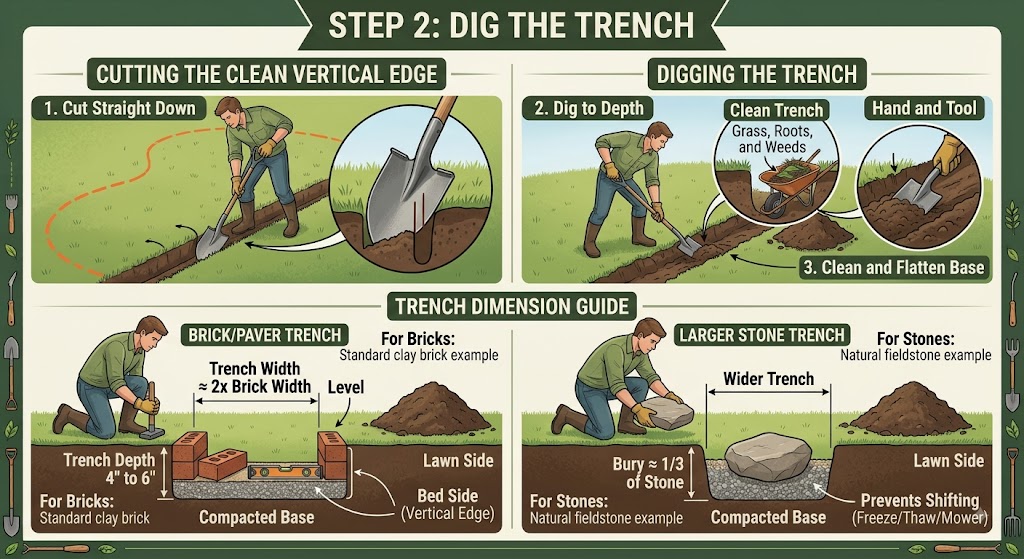
Using your flat shovel, cut straight down along the marked line to create a clean vertical edge on the bed side. Then dig a trench along that line. How deep and wide you go depends on your material. Bricks and pavers typically need a trench about twice the width of the brick and 4 to 6 inches deep. Larger stones need a wider trench, and the depth should be enough to bury roughly one-third of each stone below ground level. Burying part of the material anchors it in place and prevents it from shifting when the ground freezes and thaws or when someone bumps it with a mower.
As you dig, remove any grass, roots, or weeds from the trench. This is also a good time to knock loose soil out of the trench so you're working with a clean, flat base.
Step 3: Add a Base Layer
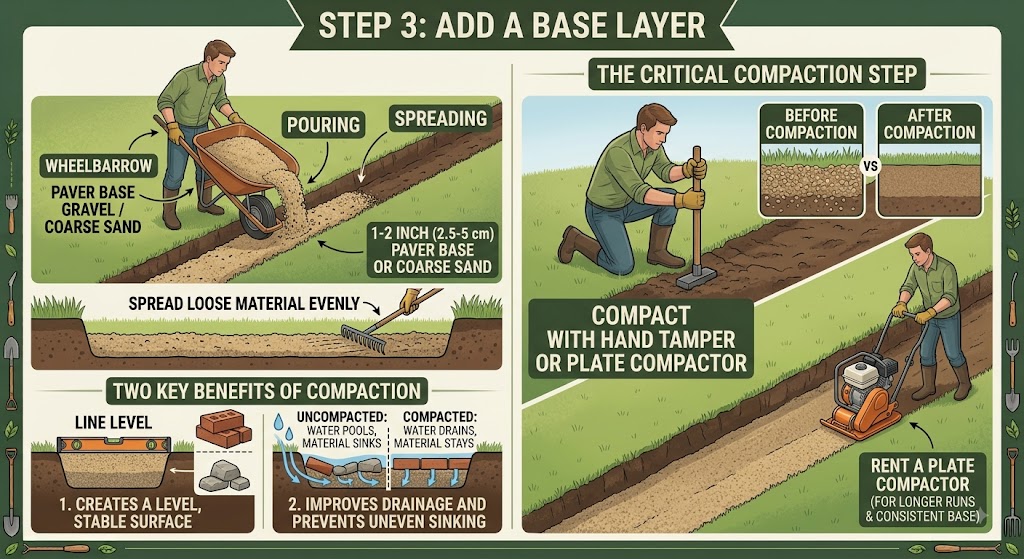
This is the step most beginners skip, and it's the one that determines whether your edging stays straight for years or starts leaning and shifting within a single season. Pour a 1 to 2 inch layer of coarse sand or paver base gravel into the bottom of the trench. Spread it evenly, then compact it using a hand tamper. For longer runs of edging, renting a plate compactor for an afternoon will save your back and give you a much more consistent base.
A compacted base does two things: it creates a level surface to set your stone or brick on, and it improves drainage so water doesn't pool underneath and cause the material to sink unevenly over time.
Step 4: Lay Landscape Fabric (Optional but Recommended)
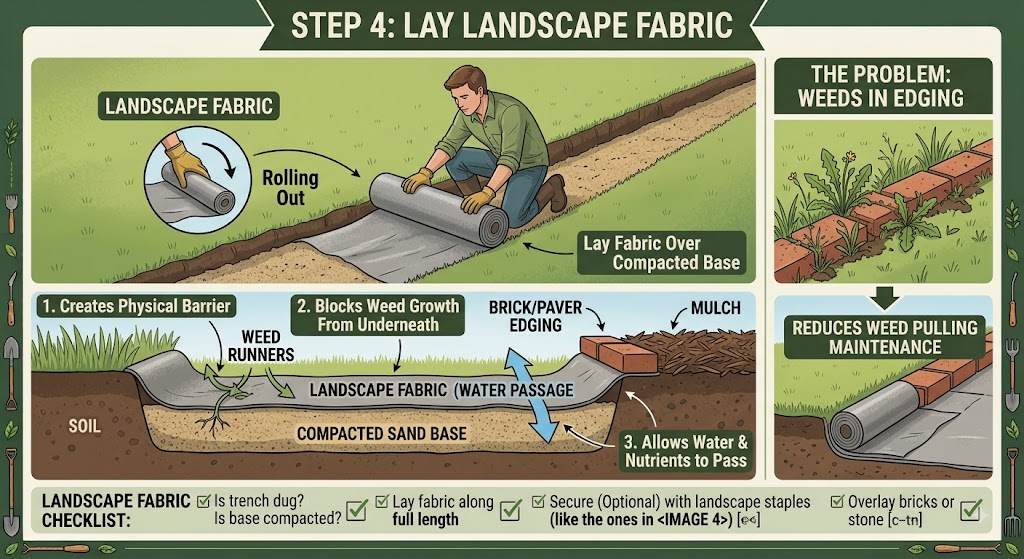
If weeds sprouting up between your stones sounds like a headache you'd rather avoid, roll out landscape fabric along the trench before placing your edging material. This creates a barrier that blocks weed growth from underneath while still allowing water to pass through. It's not strictly necessary, but most people who skip this step end up wishing they hadn't after pulling weeds from between bricks every few weeks.
Step 5: Set the First Piece and Establish Your Level
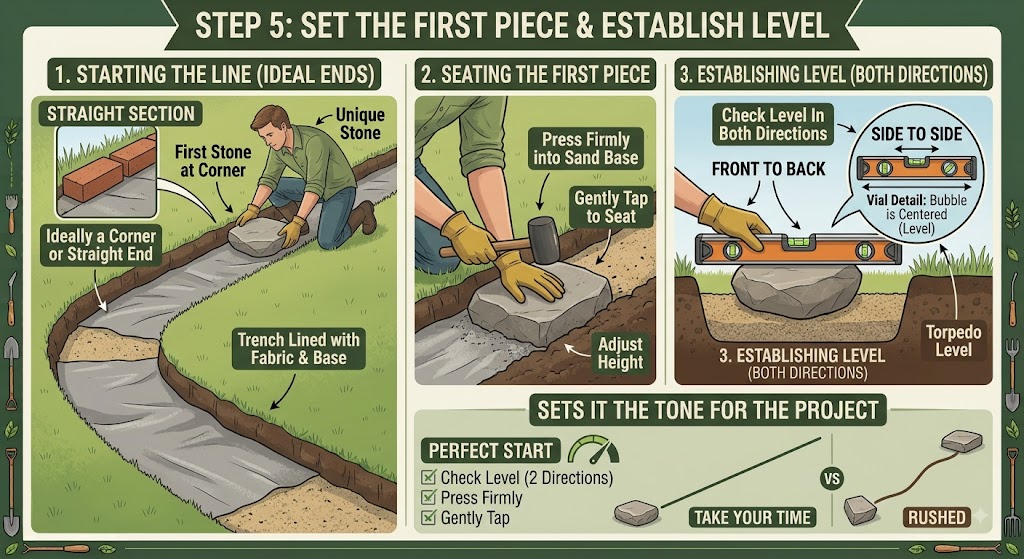
Start at one end of the trench, ideally a corner or a straight section, and set your first stone or brick in place. Press it firmly into the sand base, then check it with your level in both directions, side to side and front to back. Tap it gently with the rubber mallet to seat it and adjust the height. This first piece sets the tone for the entire project, so take your time here rather than rushing ahead.
Step 6: Continue Along the Trench
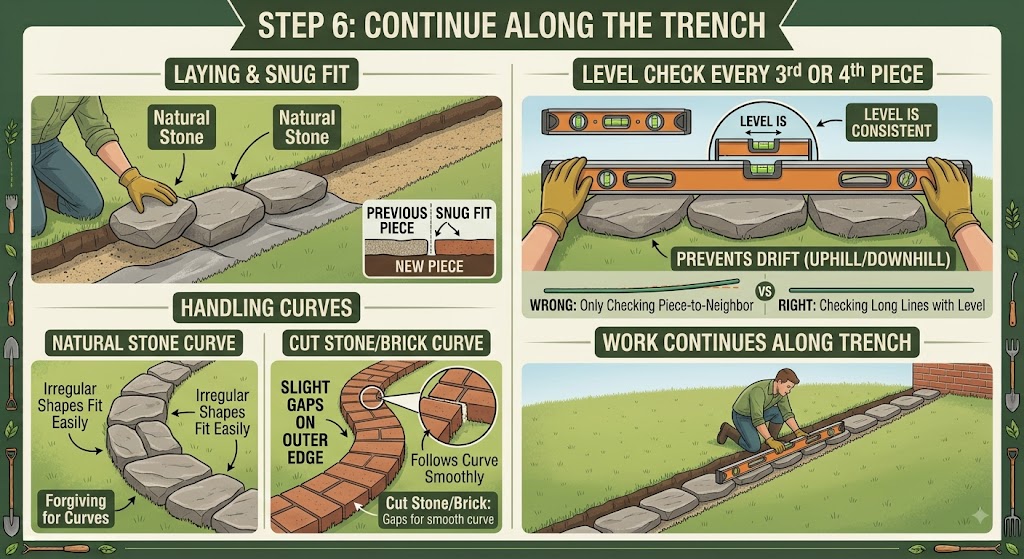
Work your way along the trench, placing each stone or brick snugly against the previous one. Check every third or fourth piece with your longer level to make sure the whole line stays consistent, not just piece to piece but across several feet at a time. It's easy for a border to slowly drift uphill or downhill if you're only checking one piece against its neighbor.
For curved sections, cut stone pavers or brick may need slight gaps on the outer edge of the curve to follow the line smoothly. Natural stone handles curves more forgivingly since irregular shapes fit together without needing precise angles.
Advertisement
Step 7: Backfill and Stabilize
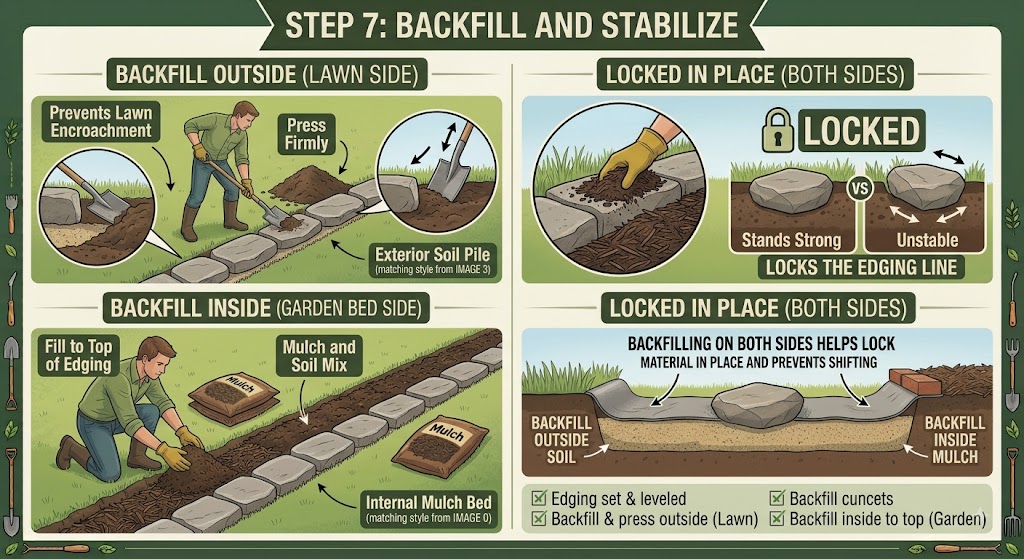
Once your edging is set and leveled along the entire bed, backfill soil against the outside of the border (the lawn side) and press it firmly against the stone or brick. On the inside, backfill with soil or mulch up to the top of the edging. This backfilling on both sides helps lock the material in place and prevents shifting.
Step 8: Final Check and Cleanup
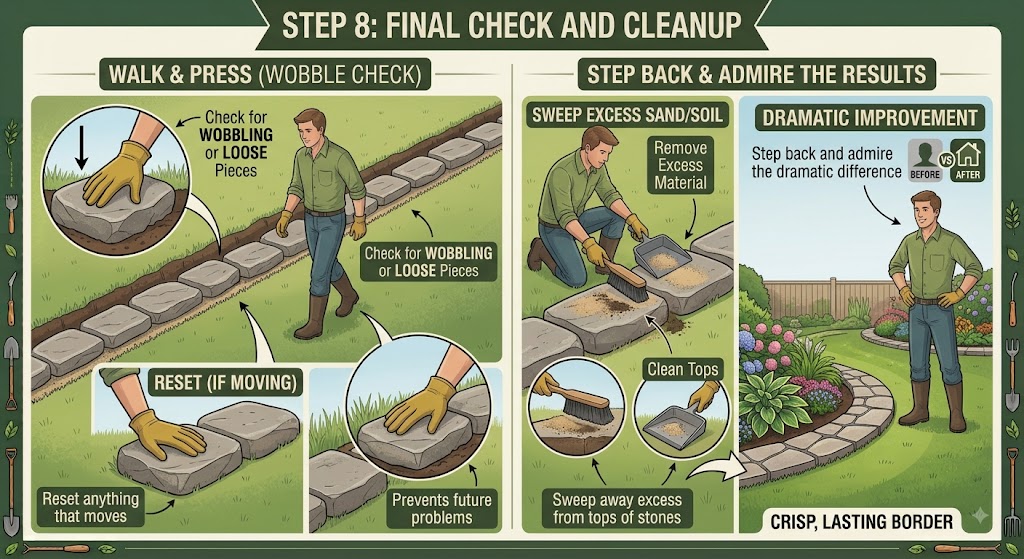
Walk the entire length of your new border and press down on each section to check for wobbling or loose pieces. Reset anything that moves before it becomes a permanent problem. Sweep away excess sand or soil from the tops of the stones, then step back and admire what is very likely a dramatic improvement to your yard's appearance.
Common Mistakes to Avoid
Even a simple project like this has a few pitfalls worth knowing about ahead of time.
| Mistake | Why It Causes Problems |
|---|---|
| Skipping the base layer | Without compacted sand or gravel underneath, edging sinks unevenly and shifts after rain or frost heave. |
| Not burying enough of the material | Stones or bricks set too shallow get knocked loose by mowers, foot traffic, or freeze-thaw cycles. |
| Ignoring drainage | Water pooling behind the edge can erode soil and eventually undermine the entire border. |
| Rushing the layout stage | A bed shape that looks awkward on the ground is much harder to fix once material is installed. |
| Using mismatched material sizes | Inconsistent stone or brick sizes make it difficult to maintain a level, professional-looking line. |
Maintaining Your New Edge
Stone and brick edging is about as low-maintenance as landscaping gets, but a little upkeep keeps it looking sharp. Every spring, walk the border and check for any pieces that have shifted over winter, especially in areas with hard freezes. Re-level and re-seat anything that's moved. Pull any grass or weeds that manage to creep along the seams, and top off mulch inside the bed as needed so the edging continues to do its job of holding everything in place.
If you used natural stone, you might notice some settling in the first year as the ground beneath fully compacts. This is normal and usually just requires a quick reset of a few stones rather than redoing the whole project.
Final Thoughts
Installing stone or brick edging is one of those weekend projects that pays off far beyond the hours you put into it. It's a permanent-feeling upgrade that keeps your beds tidy, cuts down on maintenance headaches, and instantly makes your landscaping look more established. Whether you go with rugged fieldstone or crisp brick pavers, the process comes down to the same fundamentals: a well-planned layout, a solid compacted base, and a level, patient hand while setting each piece. Get those three things right, and your new garden border should hold strong for many years to come.
Disclaimer, No Liability: The authors and publishers of this website are not professional contractors and assume no liability or responsibility for any injury, damage, or financial loss resulting from the use or misuse of the information provided herein. All DIY projects are undertaken entirely at your own risk.
Related Articles
Advertisement
How to Edge Garden Beds with Stone or Brick: Step-by-Step DIY Guide | Tricks and Tips for Life
Comments and Questions
Please log in to leave a comment or ask a question. Don't have an account? Register here.