How to Inspect and Repair Exterior Caulk Around Windows and Doors: Step-by-Step DIY Guide | Tricks and Tips for Life
How to Inspect and Repair Exterior Caulk Around Windows and Doors: Step-by-Step DIY Guide
Stop drafts and water damage by learning to inspect and repair exterior caulk around windows and doors with this simple DIY guide.
Home » Article » Diy » How To Inspect And Repair Exterior Caulk Around Windows And Doors Step By Step Diy GuideThe thin bead of caulk running around your windows and doors does more work than most homeowners realize, keeping out wind, rain, and pests while helping your heating and cooling system run efficiently. Over time, sun exposure and temperature swings cause caulk to crack, shrink, or pull away entirely, opening the door to drafts and water intrusion. Fortunately, refreshing exterior caulk is an inexpensive, beginner-friendly project. This guide walks through spotting problem areas, removing old caulk, and applying a clean new bead that will hold up for years.
1: Inspecting for Damaged or Failing Caulk
A thorough inspection helps you catch small gaps before they lead to bigger problems like water-damaged trim or higher energy bills.
What to Look For
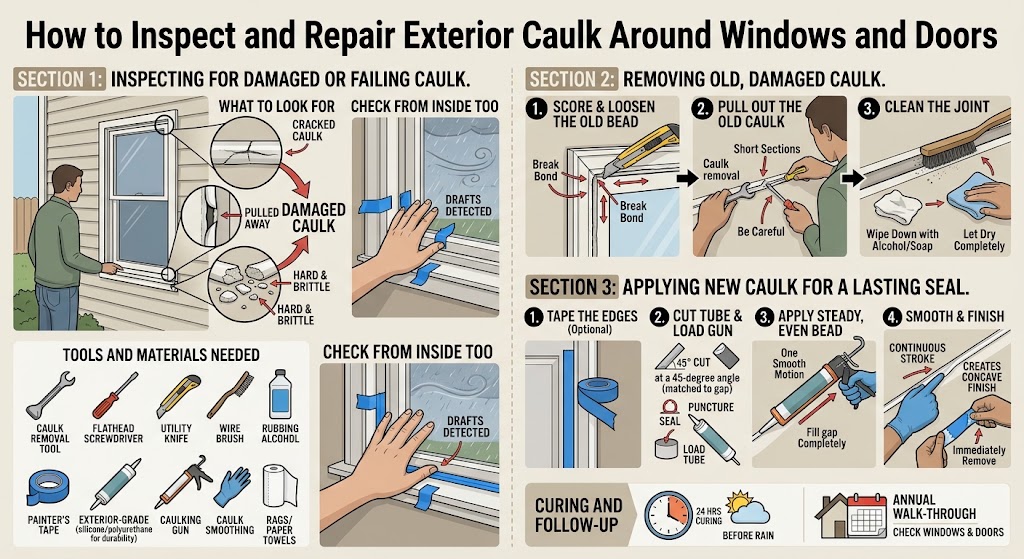
Walk the exterior of your home and examine the seams where window and door frames meet siding, brick, or stucco. Common warning signs include visible cracks running through the caulk line, sections that have pulled away from one surface leaving a gap, caulk that feels hard, brittle, or crumbly to the touch, and areas where you can see daylight or feel air movement from inside.
Tools and Materials Needed
- Caulk removal tool or flathead screwdriver
- Utility knife
- Wire brush
- Rubbing alcohol or mild soap and water
- Painter's tape
- Exterior-grade caulk (silicone or polyurethane for best durability)
- Caulking gun
- Caulk smoothing tool or a gloved finger
- Rag or paper towels
Check From Inside Too
On a windy or cold day, hold your hand near the edges of windows and doors from inside the house to feel for drafts, which often reveal gaps that aren't obvious from a purely visual outdoor inspection. Mark problem areas with a small piece of painter's tape so they're easy to find once you're ready to make repairs.
Advertisement
2: Removing Old, Damaged Caulk
New caulk applied over old, failing caulk rarely bonds well and tends to fail again quickly, so removing the old material first is a step worth not skipping.
Step 1: Score and Loosen the Old Bead
Run a utility knife along both edges of the old caulk line to break its bond with the surrounding surfaces. This makes it much easier to pull free in one piece rather than picking at it in small fragments.
Step 2: Pull Out the Old Caulk
Use a dedicated caulk removal tool or the edge of a flathead screwdriver to pry and pull the loosened caulk away from the joint. Work in short sections, and be careful not to gouge the wood trim, vinyl, or siding underneath.
Step 3: Clean the Joint
Scrub the empty joint with a wire brush to remove any remaining bits of old caulk, dirt, or mildew. Wipe the area down with a rag dampened in rubbing alcohol, or mild soap and water followed by a clean rinse, and allow the surface to dry completely before moving on. Any residue or moisture left behind can prevent the new caulk from bonding properly.
Advertisement
3: Applying New Caulk for a Lasting Seal
With a clean, dry joint ready to go, applying the new bead is a quick process that makes a noticeable difference in comfort and protection.
Step 1: Tape the Edges (Optional but Helpful)
For a crisp, professional-looking line, run strips of painter's tape along both sides of the joint, leaving just the gap exposed. This is especially useful on visible areas like front entry doors where appearance matters most.
Step 2: Cut the Caulk Tube and Load the Gun
Cut the tip of the caulk tube at a 45-degree angle, sized to roughly match the width of the gap you're filling. Puncture the inner seal with a long nail or the built-in puncture tool on the caulking gun, then load the tube into the gun.
Step 3: Apply a Steady, Even Bead
Holding the gun at a consistent 45-degree angle, squeeze the trigger steadily while moving along the joint in one smooth motion, letting the caulk fill the gap completely rather than just sitting on top of it. Avoid stopping and starting repeatedly, which can create uneven lumps.
Step 4: Smooth and Finish
Immediately after applying, run a caulk smoothing tool or a damp, gloved finger along the bead in one continuous stroke to press it into the joint and create a neat, slightly concave finish. Remove the painter's tape right away, while the caulk is still wet, by pulling it back at a sharp angle for the cleanest edge.
Curing and Follow-Up
Most exterior caulks need at least 24 hours to cure before facing rain or heavy moisture, so check the weather forecast before starting and choose a dry stretch of days. Plan to walk the exterior of your home once a year, ideally before the harshest season in your climate, to catch new cracks early and keep your windows and doors properly sealed.
Disclaimer, No Liability: The authors and publishers of this website are not professional contractors and assume no liability or responsibility for any injury, damage, or financial loss resulting from the use or misuse of the information provided herein. All DIY projects are undertaken entirely at your own risk.
Related Articles
Advertisement
How to Inspect and Repair Exterior Caulk Around Windows and Doors: Step-by-Step DIY Guide | Tricks and Tips for Life
Comments and Questions
Please log in to leave a comment or ask a question. Don't have an account? Register here.