How to Replace a Bathroom Sink Faucet: Step-by-Step DIY Guide | Tricks and Tips for Life
How to Replace a Bathroom Sink Faucet: Step-by-Step DIY Guide
Upgrade your bathroom with this step-by-step DIY guide to removing an old faucet and installing a new one, no plumber required.
Home » Article » Diy » How To Replace A Bathroom Sink Faucet Step By Step Diy GuideA dripping, corroded, or outdated bathroom faucet is one of the more satisfying fixtures to replace yourself, offering an instant style upgrade along with better function. While working under a cramped sink cabinet takes a bit of patience, the actual plumbing connections involved are usually straightforward, and most homeowners can complete the swap in an hour or two without calling a plumber. This guide walks through removing the old faucet, prepping the sink, and installing and testing the new one.
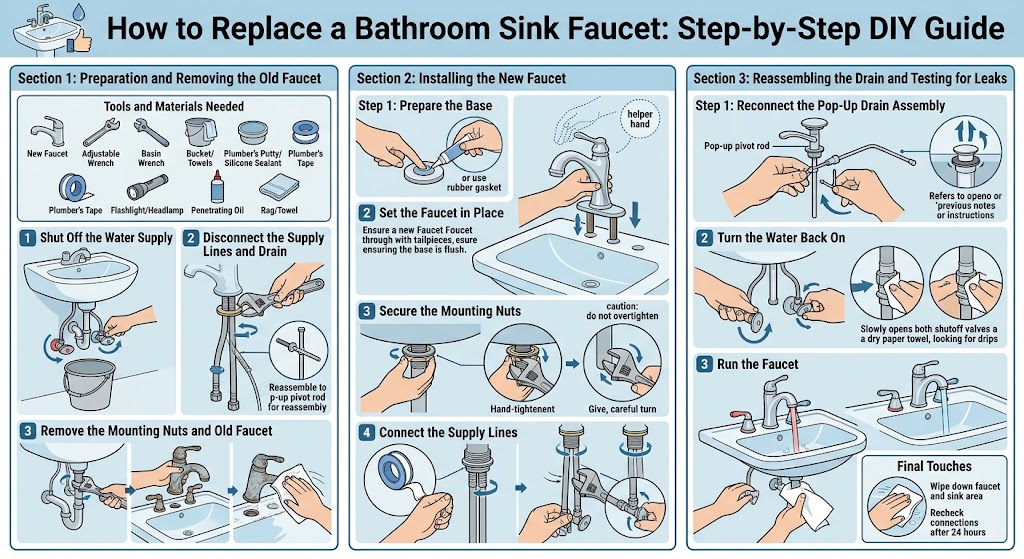
1: Preparation and Removing the Old Faucet
Getting organized before you start, and working through removal methodically, sets you up for a smooth installation later.
Tools and Materials Needed
- New faucet (check that it matches your sink's hole configuration and spacing)
- Adjustable wrench and/or basin wrench
- Bucket or towels for spills
- Plumber's putty or silicone sealant
- Plumber's tape (Teflon tape)
- Flashlight or headlamp
- Penetrating oil (for stubborn, corroded fittings)
- Rag or old towel
Step 1: Shut Off the Water Supply
Locate the shutoff valves beneath the sink, typically one for hot and one for cold water, and turn them clockwise until fully closed. Open the faucet handles afterward to release any remaining pressure and confirm the water is off, and place a towel or small bucket underneath to catch any residual drips.
Step 2: Disconnect the Supply Lines and Drain
Using an adjustable wrench, disconnect the supply lines from the shutoff valves and from the bottom of the faucet itself. If your faucet includes a pop-up drain assembly, disconnect the horizontal pivot rod that links it to the drain lever as well, noting how it's connected so reassembly is easier later.
Step 3: Remove the Mounting Nuts and Old Faucet
Reach underneath the sink and loosen the mounting nuts holding the faucet base to the sink, using a basin wrench if space is tight, which is common in this type of work. Once the nuts are off, lift the old faucet out from above, and clean away any old putty, caulk, or mineral buildup left on the sink surface with a rag and, if needed, a plastic scraper.
Advertisement
2: Installing the New Faucet
With the sink surface clean and clear, installing the new faucet is largely the reverse process, though a few details are worth doing carefully to prevent leaks.
Step 1: Prepare the Base
If your new faucet doesn't come with a rubber gasket for the base, apply a thin rope of plumber's putty or a bead of silicone sealant around the underside edge to create a watertight seal against the sink once installed.
Step 2: Set the Faucet in Place
From above, insert the faucet's tailpieces down through the mounting holes in the sink, ensuring any decorative base plate or gasket sits flush against the sink surface. Have a helper hold the faucet steady from above if possible while you work underneath.
Step 3: Secure the Mounting Nuts
Working underneath the sink, thread the mounting nuts or washers onto the faucet's tailpieces and tighten them by hand first, then snug them further with a basin wrench, being careful not to overtighten, which can crack the sink or strip the fittings.
Step 4: Connect the Supply Lines
Wrap plumber's tape clockwise around any threaded connections, then attach new or existing supply lines between the shutoff valves and the faucet's inlet connections, hand-tightening before giving a final quarter-turn with a wrench. Avoid overtightening, since this is a common cause of cracked fittings and leaks.
Advertisement
3: Reassembling the Drain and Testing for Leaks
The final stage reconnects the drain mechanism if applicable and confirms everything is watertight before you consider the job finished.
Step 1: Reconnect the Pop-Up Drain Assembly
If your faucet includes a lift-rod-operated pop-up drain, reconnect the pivot rod to the lever on the back of the faucet, referring to your earlier notes or the manufacturer's instructions for correct positioning. Test that the drain stopper opens and closes smoothly when the lever is operated.
Step 2: Turn the Water Back On
Slowly reopen both shutoff valves and check all connections beneath the sink closely for drips, keeping a dry paper towel handy to touch against joints, which reveals even small leaks that might not be visible to the eye alone.
Step 3: Run the Faucet
Turn on the faucet and let hot and cold water run for a minute or two, checking water pressure and temperature switching correctly, while continuing to monitor the connections below for any sign of leaking under active water flow.
Final Touches
Wipe down the new faucet and surrounding sink area, removing any excess putty or sealant that squeezed out during installation. Recheck all connections after 24 hours of normal use, since some fittings settle slightly and may need a small additional tightening once the system has been used a few times.
Disclaimer, No Liability: The authors and publishers of this website are not professional contractors and assume no liability or responsibility for any injury, damage, or financial loss resulting from the use or misuse of the information provided herein. All DIY projects are undertaken entirely at your own risk.
Related Articles
Advertisement
How to Replace a Bathroom Sink Faucet: Step-by-Step DIY Guide | Tricks and Tips for Life
Comments and Questions
Please log in to leave a comment or ask a question. Don't have an account? Register here.