How to Stain and Seal a Wooden Deck or Fence: Step-by-Step DIY Guide | Tricks and Tips for Life
How to Stain and Seal a Wooden Deck or Fence: Step-by-Step DIY Guide
Protect your wooden deck or fence with this step-by-step DIY guide to cleaning, staining, and sealing for a lasting, weather-ready finish.
Home » Article » Diy » How To Stain And Seal A Wooden Deck Or Fence Step By Step Diy GuideSun, rain, and temperature swings take a toll on outdoor wood, causing it to gray, crack, and eventually rot if left unprotected. Staining and sealing a deck or fence not only restores its rich color but creates a barrier against moisture that can add years to its life. While it requires a bit of patience for proper drying times, this is a project well within reach for most homeowners. This guide covers cleaning and prepping the wood, applying stain correctly, and sealing it for lasting protection.
1: Cleaning and Prepping the Wood Surface
Stain only adheres well to clean, bare wood, so the prep stage is arguably the most important part of the entire project. Skipping it leads to blotchy, peeling results.
Tools and Materials Needed
- Deck cleaner or oxygen bleach solution
- Stiff-bristle scrub brush or pressure washer
- Wood brightener (if using a pressure washer or harsh cleaner)
- Sandpaper (80-120 grit) or a sander for rough spots
- Plastic sheeting to protect nearby plants and surfaces
- Exterior wood stain (solid, semi-transparent, or transparent)
- Exterior sealant, or a stain-and-sealer combination product
- Paintbrush, roller, or pump sprayer
- Painter's tape
Step 1: Clear and Clean the Area
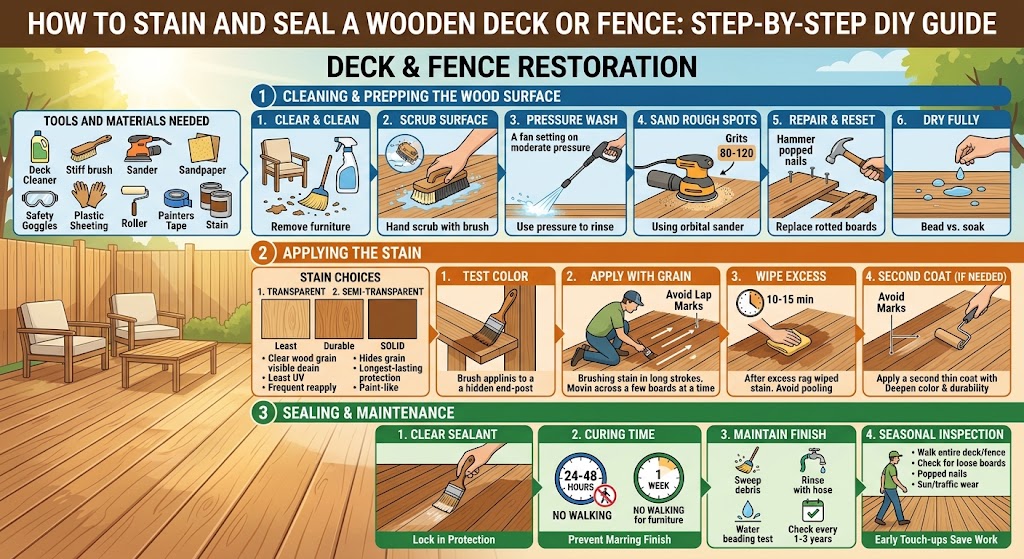
Remove furniture, planters, and grills from the deck, or cover nearby plants and siding with plastic sheeting if working on a fence. Sweep away leaves and debris, then apply a deck cleaner according to the product's instructions, scrubbing with a stiff brush to lift dirt, mildew, and old, flaking finish. A pressure washer can speed this along but should be used on a wide fan setting and moderate pressure to avoid gouging the wood grain. How to Power Wash Exterior Siding and Decks: Step-by-Step DIY Guide
Step 2: Sand and Repair
Once the wood is dry, sand any rough, splintered, or previously painted areas smooth. Check for protruding nails or screws and reset them below the surface, and replace any boards that show significant rot or splitting before proceeding.
Step 3: Let the Wood Dry Fully
Wood needs to be completely dry before stain will absorb properly, which typically means waiting 24 to 48 hours after cleaning, longer in humid conditions. A simple test is to sprinkle a few drops of water on the surface; if it soaks in rather than beading up, the wood is ready.
Advertisement
2: Applying the Stain
With clean, dry, bare wood as your canvas, it's time to add color and the first layer of protection.
Choosing the Right Stain
Transparent stains show the most wood grain but offer the least UV protection and need reapplication most often. Semi-transparent stains strike a balance between natural appearance and durability, while solid stains behave more like paint, hiding the grain but offering the longest-lasting protection, especially for older or less attractive wood.
Step 1: Test in an Inconspicuous Area
Apply a small amount of stain to a hidden section, such as the underside of a step or an end post, and let it dry fully to check the color before committing to the whole surface.
Step 2: Apply with the Grain
Working in small sections, apply stain with a brush, roller, or sprayer, always moving with the direction of the wood grain. On decks, work across a few boards at a time; on fences, complete one full panel before moving to the next to avoid visible lap marks where wet and dry stain overlap.
Step 3: Wipe Away Excess
For most penetrating stains, wipe off any pooled excess with a clean rag after 10 to 15 minutes, since stain left sitting on the surface can dry tacky or uneven. Check the product label, as timing varies by brand and formula.
Step 4: Apply a Second Coat If Needed
Many stains benefit from a second thin coat once the first has dried, typically after several hours to overnight. A second coat deepens the color and adds extra durability, particularly on high-traffic deck boards.
Advertisement
3: Sealing and Ongoing Maintenance
If your chosen product is a stand-alone stain rather than a combination stain-and-sealer, a separate sealing step locks in protection against moisture and UV damage.
Applying a Clear Sealant
Once the stain has cured according to the manufacturer's recommended time, usually 24 to 72 hours, apply a clear exterior sealant using a brush or roller in thin, even coats. Pay extra attention to horizontal surfaces like deck boards and fence caps, which take the brunt of rain and sun exposure.
Curing Time Before Use
Avoid walking on a freshly sealed deck or leaning anything against a fence for at least 24 to 48 hours, and hold off on placing furniture or rugs back for a full week to prevent marring the finish before it fully hardens.
Maintaining the Finish Over Time
Sweep debris off the deck regularly and rinse both deck and fence with a garden hose a few times a season to prevent dirt buildup. Watch for signs of wear such as graying wood or water no longer beading on the surface, which typically indicate it's time to clean and reapply stain, usually every one to three years depending on your climate and the product used.
Seasonal Inspection Tips
Each spring and fall, walk the full length of your deck or fence checking for loose boards, popped nails, or areas where the finish has worn thin, especially spots that get direct afternoon sun or heavy foot traffic. Addressing small wear spots early with a touch-up coat is far easier than waiting until the whole structure needs a full strip and refinish.
Disclaimer, No Liability: The authors and publishers of this website are not professional contractors and assume no liability or responsibility for any injury, damage, or financial loss resulting from the use or misuse of the information provided herein. All DIY projects are undertaken entirely at your own risk.
Related Articles
Advertisement
How to Stain and Seal a Wooden Deck or Fence: Step-by-Step DIY Guide | Tricks and Tips for Life
Comments and Questions
Please log in to leave a comment or ask a question. Don't have an account? Register here.