How to Build a Raised Garden Bed: Step-by-Step DIY Guide | Tricks and Tips for Life
How to Build a Raised Garden Bed: Step-by-Step DIY Guide
Build a sturdy raised garden bed this weekend with our step-by-step DIY guide covering materials, layout, assembly, and soil filling.
Home » Article » Diy » How To Build A Raised Garden Bed Step By Step Diy GuideA raised garden bed gives you more control over soil quality, drainage, and weed control than planting directly in the ground, and it makes tending your vegetables or flowers far easier on your back. Best of all, a basic raised bed can be built in a single weekend with simple lumber and hand tools. This guide covers choosing materials, cutting and assembling the frame, placing it in your yard, and filling it with the right soil mix to get your plants off to a strong start.
1: Planning and Gathering Materials
Good planning up front saves you a second trip to the hardware store and ensures your bed fits your space and gardening goals.
Choosing a Location
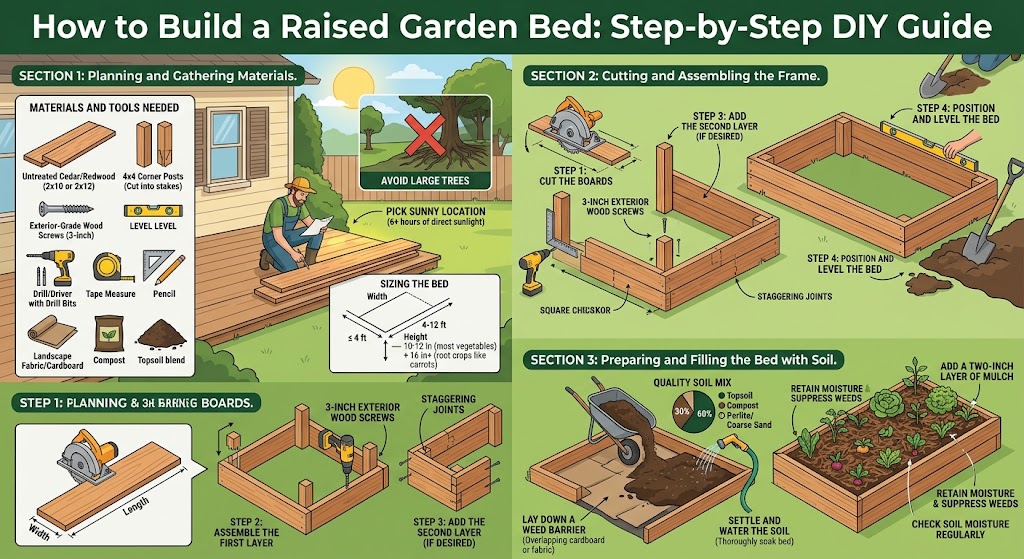
Pick a spot that receives at least six hours of direct sunlight a day for most vegetables, and check that the ground drains reasonably well, meaning water doesn't pool there after rain. Keep the bed within reach of a hose or irrigation source, and avoid placing it directly under large trees where roots and shade can compete with your plants.
Sizing the Bed
A width of no more than four feet lets most gardeners reach the center from either side without stepping into the bed and compacting the soil. Length is flexible and can run anywhere from four to twelve feet depending on your space. A height of 10 to 12 inches works well for most vegetables, while root crops like carrots benefit from beds 16 inches or deeper.
Materials and Tools Needed
- Untreated cedar, redwood, or pine boards (2x10 or 2x12 lumber is common)
- 4x4 corner posts, cut into short stakes
- Exterior-grade wood screws (3-inch)
- Drill/driver and drill bits
- Tape measure, square, and pencil
- Landscape fabric or cardboard (optional, for weed barrier)
- Garden soil, compost, and topsoil blend
- Level
Advertisement
2: Cutting and Assembling the Frame
With materials in hand, the next step is cutting your lumber to size and putting the box together. This can be done at the hardware store if they offer cutting services or at home with a circular saw.
Step 1: Cut the Boards
Cut two boards to your chosen length and two to your chosen width for each layer of the bed. If stacking two rows of boards for extra height, cut a second matching set. Cut your 4x4 posts into stakes roughly 12 to 18 inches long, which will anchor the corners and, if the bed is long, the midpoints of each side.
Step 2: Assemble the First Layer
Lay out the four boards for the bottom layer into a rectangle. Place a corner post inside each corner and drive screws through the boards into the post on both sides, creating a solid right angle. Check each corner with a square as you go to keep the frame true.
Step 3: Add the Second Layer (If Desired)
If you're building a taller bed, stack a second layer of boards on top of the first, staggering the joints if using shorter offcuts for strength. Screw the second layer into the same corner posts, and add extra stakes along long sides if the boards start to bow outward once filled with soil.
Step 4: Position and Level the Bed
Move the assembled frame to its final location. Use a level to check both directions, and dig out or fill in high and low spots in the ground beneath it as needed so the finished bed sits evenly rather than tilted.
Advertisement
Section 3: Preparing and Filling the Bed with Soil
The final stage transforms your empty wooden frame into a ready-to-plant growing space.
Lay Down a Weed Barrier
If building over grass or weedy ground, line the bottom of the frame with several overlapping layers of cardboard or a strip of landscape fabric. This blocks existing vegetation from growing up into your bed while still allowing worms and drainage to pass through as the cardboard breaks down.
Fill with a Quality Soil Mix
A commonly recommended blend for raised beds is roughly 60 percent quality topsoil, 30 percent compost, and 10 percent aeration material such as perlite or coarse sand. Fill the bed to about an inch below the top edge, leaving room for mulch and watering without soil spilling over the sides.
Settle and Water the Soil
Water the filled bed thoroughly and let it settle for a day or two before planting. The soil level will drop slightly as it compacts, which is normal; simply top it off with a bit more mix if needed.
Ongoing Care Tips
Add a two-inch layer of mulch once plants are established to retain moisture and suppress weeds. Raised beds tend to dry out faster than in-ground gardens, so check soil moisture regularly, especially during hot months, and plan to replenish compost each season to keep the soil fertile for years of productive growing.
Disclaimer, No Liability: The authors and publishers of this website are not professional contractors and assume no liability or responsibility for any injury, damage, or financial loss resulting from the use or misuse of the information provided herein. All DIY projects are undertaken entirely at your own risk.
Related Articles
Advertisement
How to Build a Raised Garden Bed: Step-by-Step DIY Guide | Tricks and Tips for Life
Comments and Questions
Please log in to leave a comment or ask a question. Don't have an account? Register here.