How to Install Solar Landscape and Pathway Lighting: Step-by-Step DIY Guide | Tricks and Tips for Life
How to Install Solar Landscape and Pathway Lighting: Step-by-Step DIY Guide
Brighten your yard with this step-by-step DIY guide to installing solar landscape and pathway lighting quickly, with no wiring needed.
Home » Article » Diy » How To Install Solar Landscape And Pathway Lighting Step By Step Diy GuideSolar landscape and pathway lights are one of the easiest outdoor upgrades a homeowner can make, requiring no electrical wiring, trenching, or permits since each fixture generates and stores its own power from sunlight. Beyond boosting curb appeal, well-placed solar lights improve nighttime safety along walkways, steps, and driveways. This guide covers choosing the right lights and layout, installing them properly for maximum sun exposure, and getting the most performance and longevity out of your new lighting.
1: Planning Your Layout and Choosing Fixtures
A little planning ensures your lights actually charge well and illuminate the areas that matter most, rather than ending up in shady spots where they'll barely glow at night.
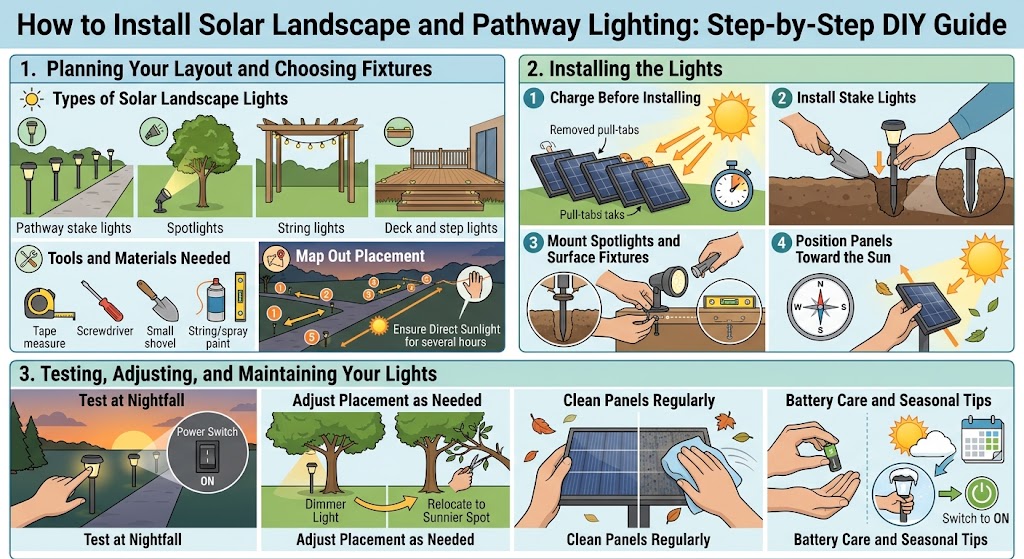
Types of Solar Landscape Lights
- Pathway stake lights: Line walkways and driveways with soft, evenly spaced illumination.
- Spotlights: Highlight trees, flags, or architectural features with a focused beam.
- String lights: Add ambient lighting to patios, pergolas, or fences.
- Deck and step lights: Mount to surfaces to improve visibility on stairs and edges.
Tools and Materials Needed
- Solar light fixtures of your choice
- Tape measure
- Screwdriver (for surface-mounted fixtures)
- Small shovel or trowel (for stake lights)
- String or spray paint for marking layout (optional)
- Level (for mounted fixtures)
Map Out Placement
Walk your yard at dusk or after dark to identify the darkest, most hazardous spots, such as uneven steps or a winding path, and prioritize lighting those areas first. For pathway lights, spacing them roughly six to eight feet apart usually provides continuous, even coverage without looking like a runway. Just as important, confirm each planned spot receives strong, direct sunlight for at least several hours a day, since shaded locations under trees, eaves, or awnings will leave solar panels undercharged.
Advertisement
2: Installing the Lights
Installation methods vary slightly by fixture type, but most solar lights are designed for tool-free or minimal-tool setup.
Step 1: Charge Before Installing
Remove any protective pull-tabs from the battery compartment and let each light charge in direct sunlight for a full day before installing, which activates the battery and lets you confirm each unit is functioning before it's placed in the ground or mounted.
Step 2: Install Stake Lights
For pathway stake lights, use a small shovel or trowel to loosen the soil at each marked location, then push the stake firmly into the ground until the fixture sits stable and doesn't wobble. In rocky or compacted soil, twisting the stake gently while pushing down helps it seat without bending the metal spike.
Step 3: Mount Spotlights and Surface Fixtures
For spotlights aimed at trees or features, stake them into the ground at an angle that directs light upward onto the target. For deck or step lights that mount to a surface, hold the fixture in place, mark screw hole locations, pre-drill if working with hardwood, and secure with the provided screws, checking with a level that fixtures on flat runs sit evenly.
Step 4: Position Panels Toward the Sun
For lights with an adjustable or separate solar panel, angle the panel to face the direction that receives the most sun during the day, typically south-facing in the Northern Hemisphere, and clear away any overhanging leaves or branches that could cast shade as plants grow throughout the season.
Advertisement
3: Testing, Adjusting, and Maintaining Your Lights
Once installed, give the system a night or two to prove itself before making adjustments, since first-night performance can vary depending on how much charge each light built up during setup.
Test at Nightfall
After sunset, check that each light activates automatically as designed. If a light doesn't turn on, confirm the power switch, often located under a panel flap, is set to the "on" position, since many arrive shipped in the off position to preserve battery life during storage and transit.
Adjust Placement as Needed
Over the following few nights, note any fixtures that appear dimmer than others, which usually points to inadequate sun exposure during the day. Relocate these lights to sunnier spots, or trim back vegetation that may be casting partial shade on the solar panel.
Clean Panels Regularly
Dust, pollen, and grime can build up on solar panels over time and reduce charging efficiency, so wipe each panel with a soft, damp cloth every few weeks, more often if you live in a dusty or high-pollen area. Clear away fallen leaves or snow promptly in the appropriate seasons to keep panels exposed to available light.
Battery Care and Seasonal Tips
Most solar lights use rechargeable batteries that gradually lose capacity over a few years and can be replaced individually in most fixtures rather than requiring a whole new light. In climates with harsh winters, consider bringing more delicate fixtures indoors during the coldest months, and always ensure the on/off switch is set to "on" going into spring so lights resume working automatically as daylight hours increase.
Disclaimer, No Liability: The authors and publishers of this website are not professional contractors and assume no liability or responsibility for any injury, damage, or financial loss resulting from the use or misuse of the information provided herein. All DIY projects are undertaken entirely at your own risk.
Related Articles
Advertisement
How to Install Solar Landscape and Pathway Lighting: Step-by-Step DIY Guide | Tricks and Tips for Life
Comments and Questions
Please log in to leave a comment or ask a question. Don't have an account? Register here.