How to Patch Small Holes in Drywall: Step-by-Step DIY Guide | Tricks and Tips for Life
How to Patch Small Holes in Drywall: Step-by-Step DIY Guide
Learn how to patch small holes in drywall with this easy, step-by-step DIY guide. Repair nail holes and wall dings like a pro with simple tools and techniques.
Home » Article » Diy » How To Patch Small Holes In Drywall Step By Step Diy GuideNail holes, doorknob dings, and picture-hanger mishaps are some of the most common blemishes found on interior walls. The good news is that patching a small hole in drywall is one of the easiest home repairs a beginner can tackle, and it usually costs just a few dollars in materials. With the right technique, you can leave a wall looking as smooth as the day it was painted, with no visible trace of damage. This guide walks through everything from gathering supplies to applying the final coat of paint, so you can restore your walls in an afternoon.
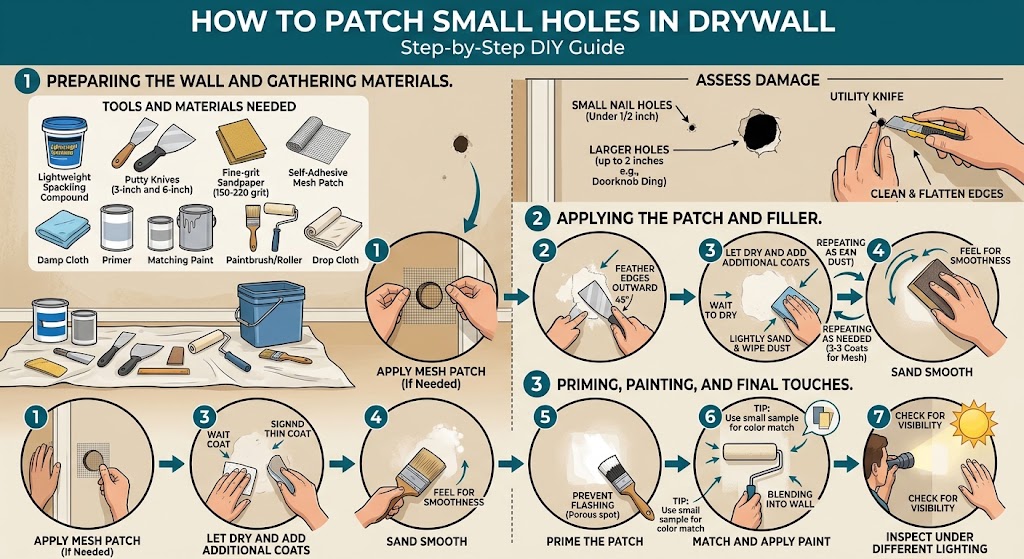
1: Preparing the Wall and Gathering Materials
Before touching any filler to the wall, take a few minutes to prepare the area properly. Rushing this stage is the number one reason patches end up looking lumpy or mismatched later on.
Tools and Materials Needed
- Lightweight spackling compound or joint compound
- Putty knife (a 3-inch and 6-inch blade are both useful)
- Fine-grit sandpaper (150-220 grit) or a sanding sponge
- Self-adhesive mesh patch (for holes larger than a coin)
- Damp cloth or tack cloth
- Primer and matching paint
- Paintbrush or small roller
- Drop cloth or old towel
Assess the Damage
Small holes generally fall into two categories: pinholes from nails or screws, and slightly larger holes up to about two inches wide, such as those left by a doorknob or wall anchor. For anything under a half-inch, spackling compound alone will do the job. For holes between a half-inch and two inches, a self-adhesive mesh patch will give the filler something to grip so it doesn't crack or sink over time.
Clean the area around the hole by brushing away loose debris, dust, or peeling paint. Use a utility knife to shave down any raised or jagged edges so the surface is as flat as possible before you begin filling.
Advertisement
2: Applying the Patch and Filler
Once the wall is prepped, it's time to fill the hole. Working in thin layers rather than one thick glob will give you a stronger, flatter result.
Step 1: Apply the Mesh Patch (If Needed)
For holes larger than a coin, peel the backing off the self-adhesive mesh patch and press it directly over the hole, centering it so it overlaps the damaged area evenly on all sides. Smooth it down with your fingers to remove air bubbles.
Step 2: Apply the First Layer of Compound
Load a small amount of spackling or joint compound onto your putty knife. Holding the blade at roughly a 45-degree angle, spread the compound over the hole or patch, pressing firmly to push material into the cavity while scraping away the excess. Feather the edges outward so the patch blends smoothly into the surrounding wall rather than sitting as a raised mound.
Step 3: Let It Dry and Add Additional Coats
Allow the first coat to dry fully, which typically takes anywhere from a few hours to overnight depending on the product and humidity. Lightly sand the area, wipe away dust, then apply a second thin coat if the first has shrunk or left a slight indentation. Larger repairs over a mesh patch often need two to three coats to fully disappear into the wall.
Step 4: Sand Smooth
Once the final coat is completely dry, sand the area using fine-grit sandpaper in gentle circular motions. Feel the surface with your palm rather than relying on your eyes alone; a properly sanded patch should be indistinguishable by touch from the surrounding wall.
Advertisement
Section 3: Priming, Painting, and Final Touches
The last stage is what makes a patch truly invisible. Skipping primer is a common mistake that leaves a dull, flat spot showing through the finished paint.
Prime the Patch
Dust the area with a dry or slightly damp cloth, then apply a thin coat of primer directly over the repaired section. Primer seals the porous compound so it accepts paint evenly and prevents the classic "flashing" effect where the patch looks duller or shinier than the rest of the wall.
Match and Apply Paint
Once the primer is dry, apply your wall paint using a small brush or foam roller, feathering the edges into the surrounding area. If you don't have leftover paint from the original job, most hardware stores can color-match a small sample using a chip cut from an inconspicuous spot, such as inside a closet or behind furniture.
Inspect Under Different Lighting
After the paint dries, check the patch under both natural daylight and artificial light, since texture differences are often more visible at certain angles. If you notice any texture mismatch, a very light stipple with a dry sponge before the paint fully sets can help mimic the original wall texture.
Final Tips
Keep a small labeled container of leftover compound and touch-up paint on hand for future nail holes, since these repairs are far quicker the second time around. With practice, most small drywall patches take less than 20 minutes of active work spread across a day of drying time.
Disclaimer, No Liability: The authors and publishers of this website are not professional contractors and assume no liability or responsibility for any injury, damage, or financial loss resulting from the use or misuse of the information provided herein. All DIY projects are undertaken entirely at your own risk.
Related Articles
Advertisement
How to Patch Small Holes in Drywall: Step-by-Step DIY Guide | Tricks and Tips for Life
Comments and Questions
Please log in to leave a comment or ask a question. Don't have an account? Register here.