How to Set Up a Drip Irrigation System for Garden Beds: Step-by-Step DIY Guide | Tricks and Tips for Life
How to Set Up a Drip Irrigation System for Garden Beds: Step-by-Step DIY Guide
Save water and time with this step-by-step DIY guide to installing a simple drip irrigation system for healthier, low-maintenance garden beds.
Home » Article » Diy » How To Set Up A Drip Irrigation System For Garden Beds Step By Step Diy GuideHand-watering garden beds day after day is time-consuming and often uneven, leaving some plants thirsty while others get too much. A drip irrigation system delivers water slowly and directly to the base of each plant, cutting water waste, reducing weed growth, and keeping foliage dry to help prevent disease. Setting one up is more approachable than it sounds, thanks to modular kits that snap together without any special tools. This guide covers planning your layout, connecting the components, and fine-tuning the system once it's running.
1: Planning Your Layout and Gathering Components
A little planning before you start cutting tubing will save you from reworking sections later and ensures every plant gets adequate water.
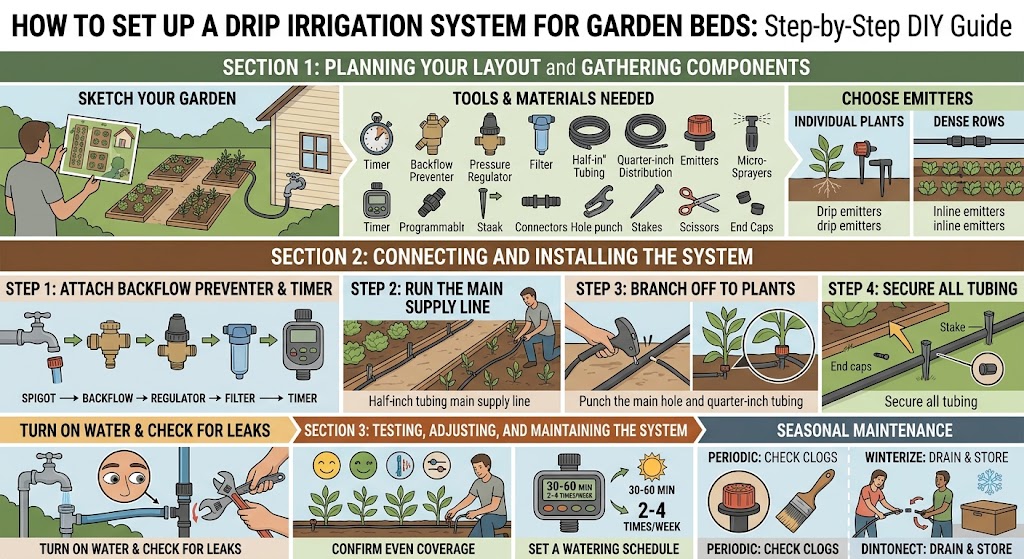
Sketch Your Garden Layout
Draw a rough map of your garden beds, noting the location of each plant or row and the distance from your water source, typically an outdoor spigot. This helps you estimate how much tubing and how many drip emitters you'll need before heading to the store.
Tools and Materials Needed
- Hose bib timer (optional but recommended)
- Backflow preventer and pressure regulator (often included in kits)
- Filter to catch sediment
- Main supply tubing (typically half-inch)
- Smaller distribution tubing (quarter-inch) for branching to individual plants
- Drip emitters or micro-sprayers
- Tubing connectors, tees, and elbows
- Stakes to hold tubing in place
- Hole punch tool for tubing
- Scissors or tubing cutter
- End caps for closing off tubing runs
Choose Emitters for Your Plants
Individual plants like tomatoes or peppers typically do well with one or two 1-2 gallon-per-hour drip emitters placed near the base. Densely planted rows, such as lettuce or herbs, often work better with inline drip tubing that has emitters built in at regular intervals along its length.
Advertisement
2: Connecting and Installing the System
With your layout planned and parts on hand, installation typically takes an afternoon for an average-sized garden.
Step 1: Attach the Backflow Preventer and Timer
Screw the backflow preventer directly onto the outdoor spigot to keep garden water from siphoning back into your home's water supply, then attach the pressure regulator and filter in line, followed by the timer if you're using one. This combination protects both your plumbing and the more delicate drip components downstream.
Step 2: Run the Main Supply Line
Connect your half-inch main tubing to the assembled fittings at the spigot and run it along the main path through your garden, securing it to the ground every few feet with stakes so it doesn't shift underfoot or in the wind. Cap the far end of the line once it reaches the last bed.
Step 3: Branch Off to Individual Beds and Plants
At each point where you need to water a bed or row, punch a small hole into the main line using the hole punch tool and insert a connector for quarter-inch distribution tubing. Run this smaller tubing to each plant, attaching a drip emitter at the end positioned a few inches from the base of the stem.
Step 4: Secure All Tubing
Use small stakes along the distribution lines to hold them in place against wind and to keep emitters positioned correctly at each plant. Cap off any unused branch ends with the provided end caps to maintain water pressure throughout the system.
Advertisement
3: Testing, Adjusting, and Maintaining the System
Once everything is connected, a test run helps you catch leaks and adjust water flow before settling into a regular watering schedule.
Turn on the Water and Check for Leaks
Open the spigot slowly and walk the length of the system, checking each connection point for drips or sprays that shouldn't be there. Tighten loose fittings or press connectors more firmly into the tubing as needed; most leaks are simply a connection that wasn't seated all the way.
Confirm Even Coverage
Watch each emitter to make sure water is reaching the base of every plant at a similar rate. Adjustable emitters can be turned to increase or decrease flow, which is useful for balancing water needs between thirstier and more drought-tolerant plants sharing the same line.
Set a Watering Schedule
Most vegetable gardens do well with drip irrigation running for 30 to 60 minutes, two to four times a week, though this varies with climate, soil type, and season. A programmable timer takes the guesswork out of daily watering and ensures consistency even when you're away.
Seasonal Maintenance
Check emitters periodically for clogs from mineral deposits or debris, and clean or replace them as needed. Before winter in freezing climates, disconnect the system, drain remaining water from the lines, and store removable components indoors to prevent damage from ice expansion, then reinstall the following spring.
Disclaimer, No Liability: The authors and publishers of this website are not professional contractors and assume no liability or responsibility for any injury, damage, or financial loss resulting from the use or misuse of the information provided herein. All DIY projects are undertaken entirely at your own risk.
Related Articles
Advertisement
How to Set Up a Drip Irrigation System for Garden Beds: Step-by-Step DIY Guide | Tricks and Tips for Life
Comments and Questions
Please log in to leave a comment or ask a question. Don't have an account? Register here.