How to Weatherstrip Doors and Windows for Energy Efficiency: Step-by-Step DIY Guide | Tricks and Tips for Life
How to Weatherstrip Doors and Windows for Energy Efficiency: Step-by-Step DIY Guide
Cut energy bills and drafts with this step-by-step DIY guide to weatherstripping doors and windows for a more efficient, comfortable home.
Home » Article » Diy » How To Weatherstrip Doors And Windows For Energy Efficiency Step By Step Diy GuideSmall gaps around doors and windows are one of the most overlooked sources of energy loss in a home, letting conditioned air escape and outdoor drafts sneak in year-round. Weatherstripping is a simple, low-cost fix that seals these gaps, and most types can be installed with basic hand tools in under an hour per opening. This guide walks through identifying drafts, choosing the right type of weatherstripping for your doors and windows, and installing it correctly for a noticeably more comfortable, efficient home.
1: Finding Drafts and Choosing the Right Materials
Before buying weatherstripping, it helps to know exactly where air is escaping and which product will work best for that particular gap.
Locating Drafts
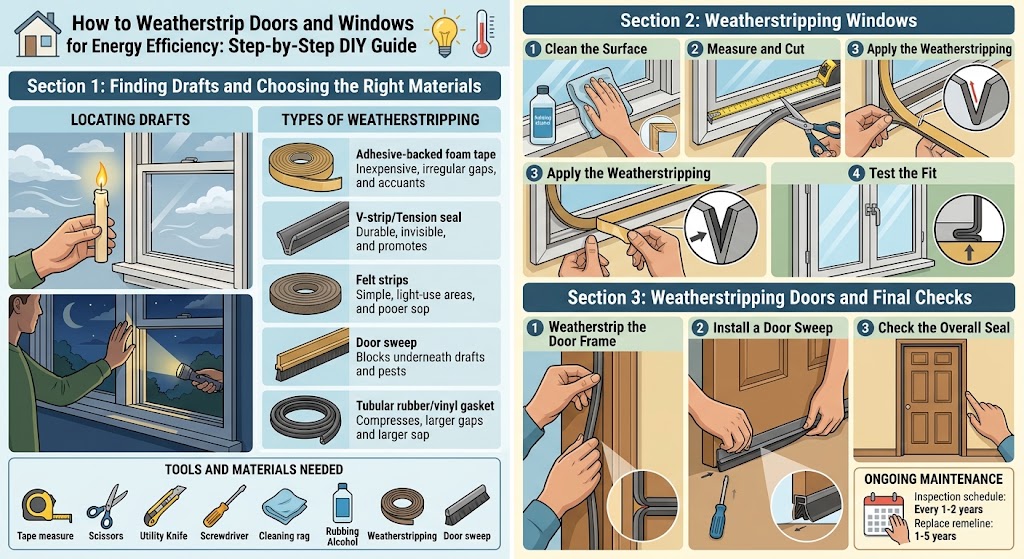
On a breezy day, hold a lit candle or a lightly dampened hand near the edges of closed doors and windows and watch for flickering or feel for moving air. Alternatively, run your hand slowly along the frame edges after dark with the lights off inside and a flashlight outside; visible light seeping through pinpoints gaps precisely.
Types of Weatherstripping
- Adhesive-backed foam tape: Inexpensive and easy for irregular gaps, though less durable long-term.
- V-strip (tension seal): Durable and nearly invisible, ideal for double-hung and sliding windows and door jambs.
- Felt strips: Simple and affordable, best for light-use areas.
- Door sweeps: Attach to the bottom of a door to block drafts and pests from underneath.
- Tubular rubber or vinyl gasket: Compresses well for larger or uneven gaps, common on exterior doors.
Tools and Materials Needed
- Tape measure
- Scissors or utility knife
- Screwdriver (for screw-mounted products)
- Cleaning rag and rubbing alcohol
- Chosen weatherstripping product(s)
- Door sweep (if applicable)
Advertisement
2: Weatherstripping Windows
Windows often have several potential gap points, including where the sash meets the frame and along the track of sliding units, so it's worth checking each surface individually.
Step 1: Clean the Surface
Wipe down the window frame and sash with a rag and rubbing alcohol to remove dust, old adhesive residue, and grime, since adhesive-backed products bond poorly to dirty surfaces.
Step 2: Measure and Cut
Measure each side of the window frame where the sash meets it when closed, and cut your chosen weatherstripping to length, mitering corners at 45 degrees for a cleaner fit where strips meet.
Step 3: Apply the Weatherstripping
For adhesive-backed foam or V-strip, peel back a few inches of backing at a time and press the strip firmly into place along the frame, working slowly to keep it straight. For V-strip specifically, position the seam so the open side of the V faces outward, away from the room, to maximize its sealing action when the window closes against it.
Step 4: Test the Fit
Close the window and check that it still latches and opens smoothly without excessive resistance. If the strip is too thick and prevents proper closing, choose a thinner profile or trim it slightly.
Advertisement
3: Weatherstripping Doors and Final Checks
Doors typically need attention in two areas: around the frame where the door meets the jamb, and along the bottom where a sweep blocks drafts from below.
Step 1: Weatherstrip the Door Frame
Clean the door jamb thoroughly, then measure and cut weatherstripping for the top and both sides where the door meets the frame when closed. Press adhesive-backed strips into place, or screw in tension-seal strips if using a more durable option, positioning them so the door compresses the material snugly without forcing the door to stick or bind.
Step 2: Install a Door Sweep
Close the door and measure the gap at the bottom, then cut a door sweep to match the width of the door. Position it against the bottom edge on the interior side, mark and pre-drill screw holes if needed, and attach it so the sweep's flexible seal makes light contact with the threshold without dragging heavily when the door opens and closes.
Step 3: Check the Overall Seal
Close the door and inspect around the entire frame for any spots of daylight or gaps still visible, adjusting or adding strips where needed. A properly sealed door should close with a bit more resistance than before, thanks to the new seal compressing against the frame.
Ongoing Maintenance
Inspect weatherstripping once or twice a year, since foam and rubber materials compress and wear out over time, typically needing replacement every one to five years depending on the material and how frequently the door or window is used. Replacing worn strips promptly keeps your home's energy efficiency consistent through every season.
Disclaimer, No Liability: The authors and publishers of this website are not professional contractors and assume no liability or responsibility for any injury, damage, or financial loss resulting from the use or misuse of the information provided herein. All DIY projects are undertaken entirely at your own risk.
Related Articles
Advertisement
How to Weatherstrip Doors and Windows for Energy Efficiency: Step-by-Step DIY Guide | Tricks and Tips for Life
Comments and Questions
Please log in to leave a comment or ask a question. Don't have an account? Register here.